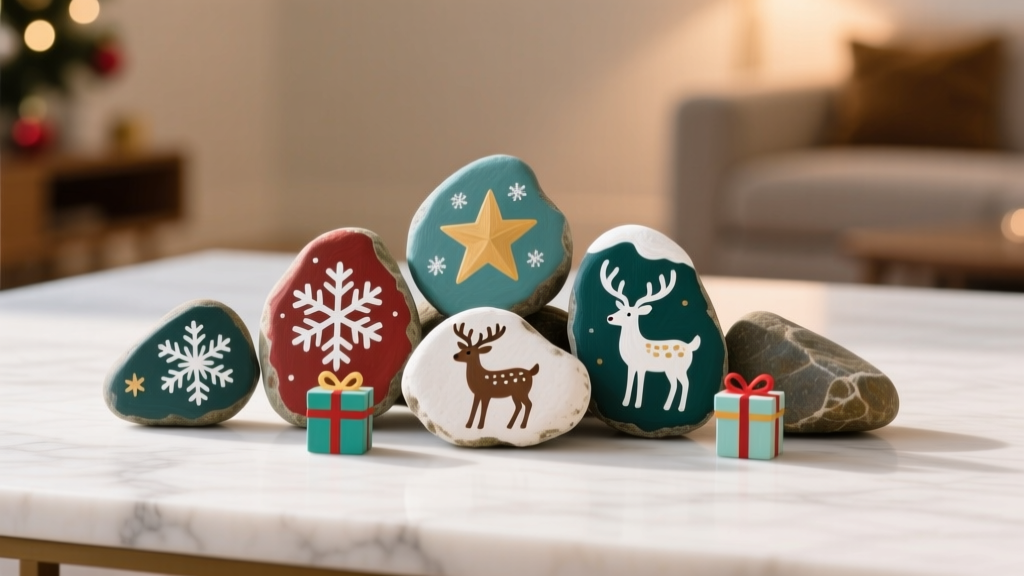
DIY Painted Rocks for Holidays
Painted rocks are one of those rare DIY crafts that check every box: affordable, relaxing, kid-friendly (with supervision), and genuinely useful for party decorations. Whether you’re hosting a holiday dinner, planning a classroom party, or setting up a festive dessert table, a handful of hand-painted holiday rocks can turn “simple” into “wow” in minutes.
They’re also wonderfully flexible. You can make them into place cards for a holiday gathering, scatter them along a centerpiece like mini ornaments, or tuck them into treat bags as handmade party favors. If you love party prep on a budget, this is a project you can complete with supplies from a craft store—or items you already have at home.
Best of all, DIY painted rocks are easy to personalize. Create a whole set in your party color palette, match your holiday theme, or paint quick icons (snowflakes, pumpkins, hearts, fireworks) that work for multiple celebrations all year long.
Project Overview (Skill Level, Time, Best Uses)
- Skill level: Beginner-friendly (with optional advanced techniques)
- Total time: 60–120 minutes active time + 1–24 hours drying/curing (depending on sealers)
- Typical batch size: 12–24 rocks
- Best for: DIY party decorations, handmade holiday decor, party favors, place cards, kids’ craft tables
Great Holiday Uses for Painted Rocks
- Table scatter: Small rocks as “confetti” around a centerpiece
- Place cards: Paint names on flat stones for each guest
- Party favor: One rock per guest in a mini organza bag (3x4 in)
- Tiered tray decor: Add holiday icons that mix with candles and mini signs
- Outdoor décor: Seal well and add to planters, porch pots, or walkway edges
Materials & Estimated Costs (Budget-Friendly Options Included)
Costs vary by location and what you already own, but you can usually make a full set for less than the cost of one store-bought holiday décor piece.
Rocks (Base Material)
- Smooth river rocks (2–3 in wide for icons; 3–4 in for names): $5–$12 per 2–5 lb bag
- Flat stones (best for place cards): $8–$15 per bag
- Free option: Collected rocks (choose smooth, non-crumbly stones)
Paint & Markers
- Acrylic craft paint (multi-pack or basic colors): $8–$18
- Paint pens (oil-based or acrylic paint markers for details): $10–$20
- Optional: Metallic acrylic paint (gold/silver) for holiday shine: $3–$6 per bottle
Brushes & Tools
- Brush set: Round size 0–2 for details + flat 6–10 for base coats: $6–$12
- Dotting tools (or use the eraser end of a pencil/bobby pin): $5–$10
- Palette: Paper plate or plastic palette: $1–$5
- Painter’s tape (for stripes/clean lines): $4–$8
Prep & Finishing Supplies
- Dish soap + scrub brush (to clean rocks): $2–$5
- Rubbing alcohol (final wipe for better adhesion): $2–$4
- Sandpaper (220 grit, optional for smoothing): $3–$6
- Sealer: Clear acrylic spray (matte or gloss) or brush-on sealer: $6–$12
Helpful Extras (Not Required)
- Hot glue gun + felt (to make rocks table-safe and non-scratch): $8–$15
- Fine glitter (use sparingly, seal well): $3–$6
- Disposable gloves: $3–$8
Step-by-Step: How to Make Holiday Painted Rocks
Step 1: Choose the Right Rocks (Size & Shape)
Pick rocks based on how you’ll use them:
- Party favors/table scatter: 1.5–2.5 in rocks (easy to paint, cute in groups)
- Place cards: 3–4 in flat rocks with a smooth “front” face
- Outdoor décor: 3–5 in heavier rocks (less likely to shift)
Quick check: Avoid rocks that crumble, have flaky layers, or feel chalky.
Step 2: Clean and Dry Thoroughly
- Wash rocks in warm water with a few drops of dish soap.
- Scrub off dirt using a brush (an old toothbrush works well).
- Rinse and let dry completely (at least 1–2 hours, or overnight for best results).
- Optional: Lightly sand rough spots with 220-grit sandpaper.
- Wipe the painting surface with rubbing alcohol and let it air-dry for 2–3 minutes.
Step 3: Paint a Base Coat (Optional, But Makes Colors Pop)
If your rocks are dark or speckled, a base coat helps your design look crisp.
- Paint the “front” of the rock with white acrylic paint using a flat brush (size 6–10).
- Apply 2 thin coats instead of one thick coat (less streaking).
- Dry time: 10–15 minutes between coats (longer if humidity is high).
Step 4: Sketch Your Holiday Design
For clean results, especially on place card rocks, lightly sketch first:
- Use a pencil for light rocks or a white colored pencil for dark base coats.
- Keep shapes simple: circles, teardrops, triangles, stars, and dots are your best friends.
Step 5: Paint the Main Shapes
- Block in large areas with a medium brush (size 4–6).
- Let each layer dry before adding another color to avoid muddy edges.
- Add details with a fine round brush (size 0–2) or paint pens for crisp lines.
Step 6: Add Details That Make It “Holiday”
Details are what transform a painted rock from “cute” to “party-ready.” Try:
- Dot borders around the edge of the rock
- Metallic highlights (gold star, silver snowflake tips)
- Mini patterns: polka dots, gingham checks, candy-cane stripes
- Hand-lettering: names, dates, “Joy,” “Cheers,” “Boo!”
Step 7: Seal for Durability (Indoor vs Outdoor)
Sealing keeps your handmade holiday decorations looking polished and helps prevent chipping.
- Indoor décor: 1–2 coats of clear acrylic spray sealer (matte or gloss)
- Outdoor décor: 2–3 coats of outdoor-rated clear sealer
- Place rocks on cardboard in a well-ventilated area.
- Spray from about 8–12 inches away in light passes.
- Dry time: typically 15–30 minutes between coats (follow your product label).
- Full cure: often 24 hours for best hardness.
Holiday Design Ideas (Fast Wins + Party-Friendly Themes)
Christmas & Winter Holidays
- Santa face (red hat + white beard, simple dots for eyes)
- Snowman (three circles, scarf stripe, carrot nose triangle)
- Snowflakes (use a paint pen for thin lines)
- Candy cane stripes (use painter’s tape for clean edges)
Halloween
- Jack-o’-lantern faces on orange base coats
- Black cat silhouettes on a moon-yellow circle
- Simple ghosts (white blob + two black eyes)
- “Boo!” lettering rocks for a snack table
Thanksgiving & Fall
- Mini pumpkins, leaves, and acorns
- “Grateful” word rocks for place settings
- Warm color palette: burnt orange, mustard, brown, cream
Valentine’s Day
- Hearts with dotted borders
- Love-note rocks: “Be Mine,” “XO,” initials + date
- Great as handmade party favors for Galentine’s gatherings
New Year’s Eve
- Black base with gold dots (confetti look)
- “2026” number rocks for a photo-table display
- Firework bursts using a paint pen + metallic accents
Pro Tips for Crisp Lines, Bright Colors, and Faster Painting
- Thin coats win: Thick paint stays tacky and shows brush marks.
- Use a “rest hand” technique: Rest your painting hand on the table or your other wrist to steady tiny details.
- Paint pens for lettering: If you want place card rocks, paint pens are easier than brushes for names.
- Speed-dry station: Place rocks near a fan (not directly under high wind) to reduce dry time.
- Batch your steps: Do all base coats first, then all main shapes, then all details. Perfect for party prep.
Beginner-Friendly Adaptations (Easy Wins)
- Sticker + paint method: Apply a simple sticker (star/heart), paint around it, peel off when dry for a clean shape.
- Dot art designs: Make trees, wreaths, or fireworks using only dots in decreasing sizes.
- One-color silhouettes: Black bats, white ghosts, or gold stars look sharp with minimal effort.
- Simple name rocks: One solid base color + white paint pen for names.
Advanced Variations (For Extra “Wow” at Parties)
- Layered shading: Blend two close colors (light-to-dark) for dimension on pumpkins or ornaments.
- Mandala holiday patterns: Create a snowflake mandala using dotting tools and metallic paint.
- Chalkboard rocks: Paint with chalkboard paint, then write names/messages in chalk marker (great for buffet labeling).
- Decoupage accents: Add tiny napkin-paper motifs (like holly leaves) and seal heavily.
Troubleshooting: Quick Fixes for Common Problems
- Paint is beading up: Your rock still has residue. Wash again, dry fully, wipe with rubbing alcohol, then repaint.
- Colors look dull: Add a white base coat or do an extra thin layer of color after the first dries.
- Smudged details: Let layers dry longer; use paint pens for final outlines; avoid handling until sealed.
- Sealer stays sticky: Humidity can slow curing. Move to a warmer, drier space and allow 24–48 hours.
- Brush strokes show: Use thinner coats, a softer brush, and light pressure; consider a final coat of gloss sealer to smooth appearance.
Common Crafting Mistakes to Avoid
- Skipping cleaning: Dirt and oils cause peeling and patchy paint.
- Painting on damp rocks: Moisture trapped under paint can lead to bubbles or flaking.
- Using one thick coat: It takes longer to dry and chips more easily.
- Not sealing: Unsealed rocks scratch and smudge, especially if used as party favors.
- Spraying sealer too close: This can cause drips and cloudiness. Stick to 8–12 inches distance.
- Overloading details: Simple shapes read better from across a party table. Save intricate work for a few “feature” rocks.
FAQ: DIY Painted Rocks for Holidays
What kind of paint works best for painted rocks?
Acrylic craft paint is the go-to for DIY painted rocks because it’s affordable, easy to layer, and comes in tons of colors. Paint pens (acrylic or oil-based) are excellent for outlines, dots, and lettering on party place card rocks.
Do I have to seal painted rocks?
If the rocks are purely decorative indoors, sealing is still recommended for a finished look and better durability. For party favors, outdoor décor, or anything handled often, seal with 2–3 thin coats.
How do I make painted rocks safe for table surfaces?
Add small circles of felt to the bottom using hot glue, or apply clear bumpers. This prevents scratching and also stops rocks from sliding on smooth tables.
Can kids make holiday painted rocks?
Yes—this is a fantastic kids’ party craft. Use non-toxic acrylic paint, larger rocks (3–4 in) for easier handling, and skip spray sealer (use brush-on sealer with adult help). Paint pens are great for older kids who want crisp details.
How far ahead can I make painted rocks for a party?
Painted rocks can be made weeks ahead. Store them in a single layer (or layered with parchment paper between) after the sealer cures for at least 24 hours.
How do I turn painted rocks into place cards?
Choose flat rocks around 3–4 inches wide, paint a solid background, then write names with a paint pen (white on dark colors looks especially sharp). Seal after the ink dries so names don’t smear.
Wrap-Up: Make a Holiday Rock Set That’s Uniquely Yours
DIY painted rocks are a feel-good craft with big payoff: you get handmade holiday decorations, personalized party details, and the kind of creative break that leaves you with something you’ll actually use. Start with a simple batch—snowflakes, pumpkins, hearts, or “Cheers” rocks—then build your collection season after season.
If you make a set for an upcoming celebration, try mixing a few quick designs with a couple of “feature” rocks (like a detailed wreath or a gold-lettered year rock). Your party table will look intentional, festive, and completely you.
Happy crafting—come explore more DIY party decorations, handmade projects, and smart celebration ideas on smartpartyprep.com.
More Articles
 DIY Dream Catchers for Home Decor
 Paper Craft Backdrops Ideas
 How to Enable Third Party Cookies in 2024: A Step-by-Step Browser Guide (Chrome, Safari, Firefox, Edge) — Because Yes, Some Sites Still Need Them (and Here’s Exactly How to Do It Safely)
 Kids' Craft: Wreaths
 How to Unblock Third Party Cookies on iPad in 2024: A Step-by-Step Guide That Actually Works (No More ‘Blocked by Safari’ Errors)
 12 Do It Yourself Party Decorations That Actually Look Pro—No Glue Gun Panic, No Last-Minute Scramble, Just Joyful, Instagram-Ready Results in Under 90 Minutes
 12 Stunning Do It Yourself Western Party Decorations You Can Make in Under 2 Hours (No Craft Store Run Needed — Just Dollar Store & Recycled Supplies!)
 Easy Tote Bags for Beginners
 DIY Beaded Bracelets for Home Decor
 Step-by-Step Pressed Flower Art Tutorial