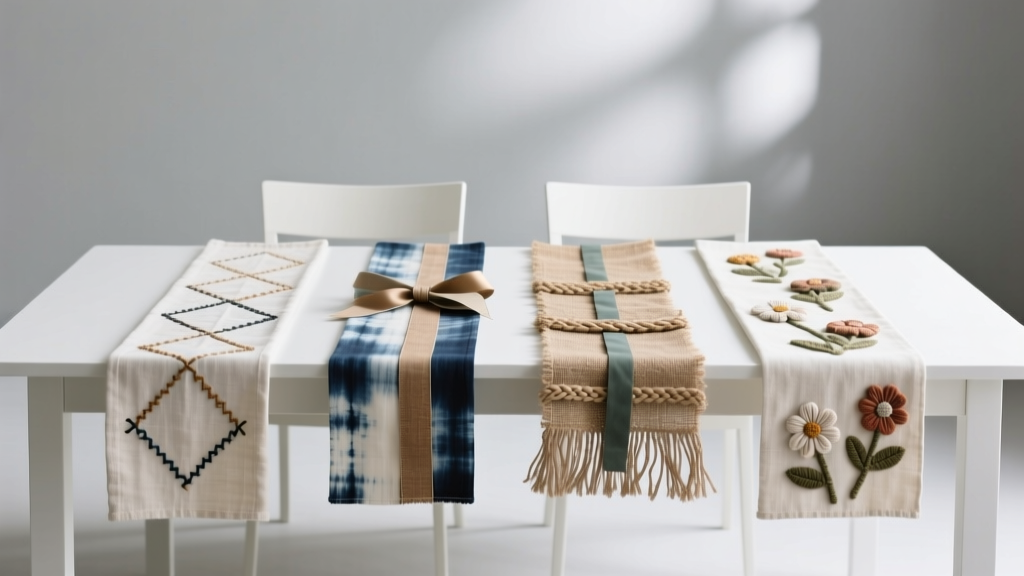
Budget DIY Table Runners Under $20
A table runner can change the entire vibe of a party table—fast. It frames your centerpiece, ties your color scheme together, and makes even simple plates and cups look intentional. The best part? You don’t need expensive linens or fancy sewing skills to get that “styled” look.
This is one of those DIY crafts that feels instantly rewarding: you can complete a runner in an afternoon, customize it to any theme (birthday, baby shower, bridal shower, graduation, holiday dinner), and make it durable enough to reuse or cute enough to toss without guilt. Whether you love fabric projects, paper crafts, or quick no-sew hacks, there’s a budget-friendly option here for you.
Below you’ll find multiple handmade table runner ideas under $20, each with a materials list, time estimate, skill level, and step-by-step instructions—plus pro tips, variations, troubleshooting, and the most common mistakes to avoid.
Quick Budget Planning: Runner Sizes + Cost Targets
Before buying anything, decide your runner length. A simple formula makes shopping easier:
- Standard table runner width: 12–16 inches
- Length guide: table length + 12–20 inches (for a 6–10 inch drop on each end)
- Common sizes:
- For a 6 ft table (72"): make a runner 84–92" long
- For a 4 ft table (48"): make a runner 60–68" long
- For an 8 ft table (96"): make a runner 108–116" long
Budget goal: $10–$20 per runner (or less if you use leftovers). Many of these can be made for $8–$15 depending on store and coupons.
Tools You’ll Use for Most DIY Table Runner Projects
You don’t need a full craft room—just a few dependable basics.
- Measuring tape (or yardstick)
- Fabric scissors (or sharp all-purpose scissors)
- Rotary cutter + cutting mat (optional but makes straighter cuts)
- Hot glue gun (low-temp is beginner-friendly) + glue sticks
- Iron (helpful for crisp edges)
- Painter’s tape or clips (to hold folds while glue sets)
DIY Table Runner #1: No-Sew Drop Cloth Runner (Farmhouse + Neutral)
Skill Level, Time, and Best For
- Skill level: Beginner
- Time: 30–60 minutes (plus optional drying time if you paint)
- Best for: rustic parties, fall tables, neutral weddings, everyday entertaining
Materials + Estimated Cost (Under $20)
- Canvas drop cloth (6 ft x 9 ft, painter’s canvas): $10–$15 (one drop cloth makes multiple runners)
- Fabric hem tape (iron-on) or fabric glue: $4–$7
- Optional: acrylic paint or fabric paint for stripes: $2–$5 (use what you have if possible)
Measurements
- Suggested runner size: 14" wide x 90" long (fits most 6 ft tables)
Step-by-Step Instructions
- Cut the fabric. Measure and cut a rectangle: 14" x 90" (or your preferred size). For a straight cut, use a rotary cutter or mark with a ruler and cut slowly.
- Create clean edges (no-sew hem). Fold each long edge over 1/2" and then another 1/2" to hide raw edges. Press with an iron.
- Secure the hem.
- If using hem tape: place tape inside the fold, iron per package directions.
- If using fabric glue: apply a thin bead inside the fold and press. Clip or tape until set.
- Finish the ends. Fold each short end 1/2" twice and secure the same way.
- Optional stripe detail. Use painter’s tape to mask 2–3 stripes across the runner (each stripe 1/2"–1" wide). Paint, let dry, peel tape.
Pro Tips + Variations
- Softened look: Wash and dry once to relax the canvas and reduce stiffness.
- Fringe edge variation: Instead of hemming, pull a few horizontal threads from each end to create a 1/2" fringe. (Best for casual, boho party decor.)
- Advanced upgrade: Sew a simple straight hem for the crispest finish and fastest production if making multiples.
Troubleshooting
- Hem won’t stick: Your iron may be too cool or you’re moving it too quickly. Re-iron with firm pressure.
- Edges look wavy: Press before securing and avoid stretching the fabric while gluing.
DIY Table Runner #2: Burlap + Lace Party Runner (Rustic Glam)
Skill Level, Time, and Best For
- Skill level: Beginner to Intermediate
- Time: 45–75 minutes
- Best for: bridal showers, rustic weddings, vintage tea parties
Materials + Estimated Cost (Under $20)
- Burlap ribbon roll (12" wide x 10 yd is common): $8–$12
- Lace trim ribbon (2"–4" wide, 2–3 yd): $3–$6
- Hot glue sticks (or fabric glue): $2–$4
Measurements
- Suggested: 12" wide x 84" long (easy and classic for a 6 ft table)
- Lace placement: centered or along both long edges
Step-by-Step Instructions
- Cut burlap length. Cut 84" (or your needed length). Keep the cut as straight as possible.
- Tame fraying. Run a thin line of fabric glue along each cut end, or fold the ends under 1/2" and hot glue in place.
- Attach lace.
- Centered lace: glue a thin line down the middle and press lace into place.
- Edge lace: glue lace along both long edges, slightly overlapping to hide rough burlap edges.
- Press flat. Place heavy books on top for 10 minutes so the lace bonds evenly.
Pro Tips + Variations
- Cleaner finish: Use wide burlap ribbon (pre-finished edges) instead of raw fabric.
- Advanced variation: Add stenciled letters (“Mr & Mrs,” “Baby,” “Happy Birthday”) using acrylic paint and a foam brush.
- Theme match: Swap lace for pom-pom trim, ric-rac, or gingham ribbon for playful party decorations.
Troubleshooting
- Lace ripples: You’re stretching as you glue. Lay lace relaxed, glue in 6–8" sections.
- Glue shows through: Use smaller dots or a thin line, and press gently.
DIY Table Runner #3: Paper “Disposable Chic” Runner (Perfect for Kids’ Parties)
Skill Level, Time, and Best For
- Skill level: Beginner (great for crafting with kids)
- Time: 20–40 minutes
- Best for: birthdays, game day, classroom parties, outdoor celebrations
Materials + Estimated Cost (Under $20)
- Kraft paper roll or white/brown gift wrap roll (18"–24" wide): $5–$10
- Washi tape (1–3 rolls): $3–$10
- Optional: markers, stamps, sticker packs: $2–$6
Measurements
- Width: 18"–24" (use roll width)
- Length: table length + 12" (example: 72" table → cut 84")
Step-by-Step Instructions
- Cut your paper. Roll out and cut to length using scissors.
- Anchor it. Use small loops of painter’s tape under the runner at each corner so it doesn’t slide.
- Add washi tape borders. Run tape along both long edges. Overlap tape ends under the paper for a neat finish.
- Decorate the center strip. Choose one:
- Confetti look: add stickers in a scattered pattern
- Interactive runner: draw a “doodle zone,” tic-tac-toe grid, or party trivia
- Patterned runner: stamp stars, hearts, or balloons every 6"
Pro Tips + Variations
- Beginner-friendly win: This is the fastest handmade party decor for last-minute hosting.
- Advanced variation: Layer two papers (kraft + white) and cut scallops or triangles along the top layer for a peek-through effect.
- Cleanup: Roll it up after the party and toss—no laundry, no stress.
Troubleshooting
- Paper curls: Reverse-roll it gently or add a few pieces of tape underneath along the centerline.
- Tape won’t stick: Wipe the table dry first—moisture and dust reduce adhesion.
DIY Table Runner #4: Bandana Patchwork Runner (Colorful, Reusable, No Sewing Required)
Skill Level, Time, and Best For
- Skill level: Beginner to Intermediate
- Time: 60–90 minutes
- Best for: summer parties, BBQs, themed birthdays, picnic-style tables
Materials + Estimated Cost (Under $20)
- Bandanas (4–6 bandanas, 20" x 20"): $1–$2 each (often $6–$12 total)
- Fusible web tape or iron-on hem tape: $5–$7
- Optional: cotton fabric for backing (1/2 yard): $4–$6
Measurements
- Example runner size: 16" x 80"
- Bandana cutting: cut bandanas into 16" x 20" panels (trim edges as needed)
Step-by-Step Instructions
- Pre-press bandanas. Iron flat so seams line up cleanly.
- Cut panels. From each bandana, cut a 16" x 20" rectangle. (Save scraps for napkin rings or bunting.)
- Arrange the layout. Place panels end-to-end until you reach your desired length (4 panels = 80"). Alternate patterns or colors for a patchwork vibe.
- Fuse seams. Butt edges together or overlap by 1/4". Place fusible tape under the seam and iron to bond.
- Finish outer edges. Fold outer perimeter 1/2" twice and fuse with hem tape. For extra durability, add a simple straight stitch if you sew.
Pro Tips + Variations
- Beginner adaptation: Skip perimeter hemming and use pinking shears to reduce fraying for a casual look.
- Advanced variation: Add a backing fabric and quilt simple straight lines across the runner for structure.
- Party theme idea: Match bandana colors to your balloon garland or paper goods for cohesive party decorations.
Troubleshooting
- Panels shift while ironing: Use pins or heat-safe clips to hold alignment before fusing.
- Fusible isn’t bonding: Increase heat slightly (no steam) and hold the iron in place 8–12 seconds per section.
Common Crafting Mistakes to Avoid (So Your Runner Looks Store-Bought)
- Cutting without measuring the table. Always measure first—especially if your table is longer than standard.
- Making it too wide. A 20"+ runner can crowd plates. Aim for 12–16" wide for most setups.
- Over-gluing. Too much hot glue creates bumps and shiny spots. Use thin lines or small dots.
- Skipping pressing/flattening. Ironing (or weighing down) is the difference between “homemade” and “handmade.”
- Forgetting washability. If you want reusable party decor, choose washable materials and avoid glues that harden stiff.
- Not testing first. Try your glue/paint/tape on a scrap to make sure it behaves the way you want.
Extra Pro Tips for Party-Ready Results
- Layer for impact: Put a narrow runner over a wider one (example: lace burlap over drop cloth) for instant dimension.
- Centerpiece planning: Keep the middle 6–10" relatively flat if you’re placing trays, cake stands, or vases.
- Make it photo-friendly: Add a subtle border (washi tape, trim, painted stripe) so the runner reads well in pictures.
- Batch-produce: If you need multiple tables, cut all lengths first, then do all hems, then all decoration steps.
FAQ: DIY Table Runners for Parties
1) What’s the cheapest DIY table runner option?
A kraft paper runner is usually the lowest cost (often $5–$10 total) and doubles as disposable party decor.
2) How long should a table runner be for a 6-foot table?
For a 72" table, aim for 84–92" long. That gives you a nice 6–10" drop on each end without getting in the way of chairs.
3) Can I make a table runner without sewing?
Yes. Hem tape, fusible web, fabric glue, or hot glue can all work depending on your material. The drop cloth and bandana runners are especially beginner-friendly no-sew projects.
4) How do I keep a runner from sliding during a party?
Use small loops of painter’s tape underneath at the corners and midpoints. For fabric runners, a non-slip drawer liner strip under the center also works well.
5) What’s the best runner material for outdoor parties?
Paper runners are easiest outdoors (no wind-resistant perfection, easy cleanup). If you want reusable, canvas/drop cloth is sturdy and less likely to blow around than lightweight fabric.
6) How do I match my table runner to my party theme?
Pull one or two accent colors from your balloons, plates, or invitations. Then add a simple repeating detail (stripe, trim, stencil, or washi tape border) to make it feel coordinated without extra cost.
Wrap-Up: Your Party Table Deserves a Handmade Touch
A budget DIY table runner is one of the quickest ways to make your setup feel styled, personal, and camera-ready—without spending more than $20. Pick a style that fits your event, follow the measurements, and keep it simple with clean edges and one standout detail.
Try one runner first, then make a second in a different colorway for your next celebration. For more DIY crafts, party decorations, and handmade project ideas, explore more inspiration on smartpartyprep.com.
More Articles
 How to Enable Third Party Cookies on MacBook Air (2020–2024): A Step-by-Step Fix for Safari, Chrome & Firefox — Because Yes, It’s Still Possible (and Here’s Exactly How)
 How to Make Party in Infinite Craft (Step-by-Step Guide): The 4 Hidden Combinations You’re Missing — Plus Why ‘Fire + Music’ Fails Every Time
 No-Sew Wreaths Tutorial
 DIY Soap Bars with Dollar Store Supplies
 How to Make Party Photo Booth in Under $40 (No Tech Skills Needed): A Foolproof 5-Step Guide That Guests Actually Love — Plus Free Printable Props & Backdrop Templates
 DIY Dream Catchers for Home Decor
 Step-by-Step Mason Jar Crafts Tutorial
 How to Make a Backdrop for a Party in Under 90 Minutes (No Sewing, No Pro Tools — Just Dollar Store Supplies & 5 Foolproof Steps)
 Budget DIY Coasters Under $15
 How to Make Tents for a Slumber Party: 7 No-Sew, Budget-Friendly Ideas That Take Under 20 Minutes (Plus Pro Tips to Keep Them Standing All Night!)