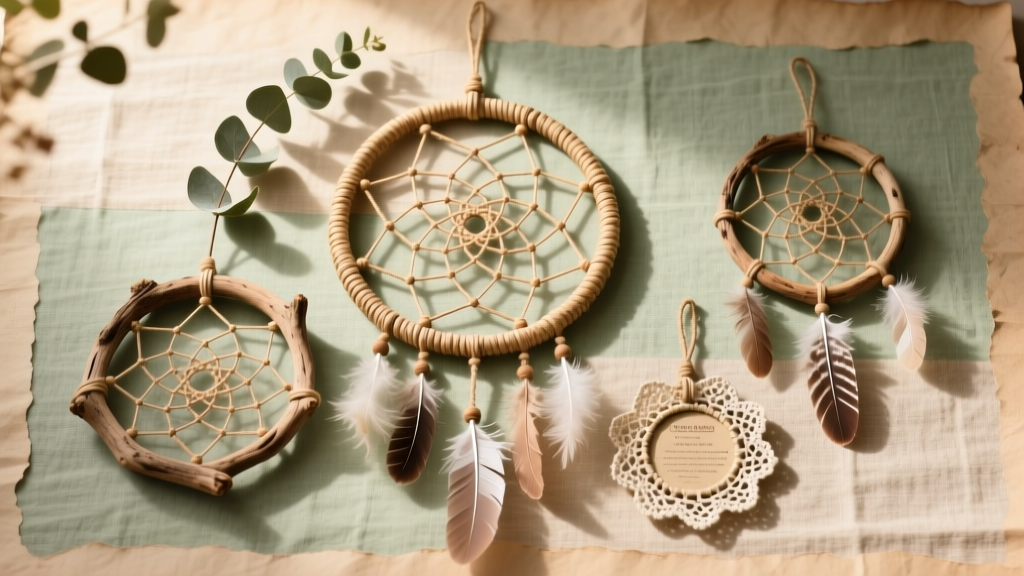
Rustic Dream Catchers Ideas
Rustic dream catchers are one of those DIY crafts that feel instantly special—part handmade decoration, part heartfelt keepsake, and totally customizable for your party theme. Whether you’re styling a boho birthday, woodland baby shower, fall wedding, or a cozy backyard gathering, a rustic dream catcher adds texture and warmth that store-bought décor just can’t match.
They’re also wonderfully practical as party décor: hang them behind a dessert table, use them as ceremony backdrops, cluster them as a photo booth wall, or make mini versions as party favors. You can keep the supplies budget-friendly, use natural textures like jute and feathers, and tailor the colors to match your palette.
Best of all, this is a relaxing, step-by-step project that works for beginners (simple weaving and knots) and still offers plenty of advanced upgrades (layered webs, macramé, florals, and mixed materials). Grab a hoop, some twine, and let’s make rustic magic.
Quick Project Overview
- Skill level: Beginner to Intermediate (advanced options included)
- Time estimate:
- Mini (4–6 in): 30–60 minutes
- Standard (8–12 in): 60–120 minutes
- Large (14–18 in): 2–3 hours
- Best uses: DIY party decorations, photo backdrop, nursery decor, handmade party favors
- Rustic style elements: jute twine, cotton cord, lace, wood beads, dried florals, neutral ribbons
Materials List (With Specific Product Types + Estimated Costs)
Costs vary by brand and where you shop, but these estimates help you plan a DIY party décor budget.
Core Supplies
- Hoop (4–18 in diameter)
- Options: metal macramé hoop, wooden embroidery hoop, willow/grapevine wreath ring
- Estimated cost: $2–$12 each
- Twine/Cord for wrapping + web
- Rustic favorites: jute twine (1–2 mm), cotton macramé cord (2–4 mm), waxed linen cord
- Estimated cost: $4–$12 per spool
- Ribbons or fabric strips (3–8 pieces)
- Types: burlap ribbon (1–2 in wide), lace trim (0.5–2 in), muslin or cotton strips
- Estimated cost: $3–$10 total
- Feathers
- Types: natural craft feathers, faux feathers, or ethically sourced feathers
- Estimated cost: $3–$8 per pack
- Beads (10–30 pieces)
- Types: unfinished wood beads (8–16 mm), small seed beads, metal spacer beads
- Estimated cost: $3–$10
Tools (Recommended)
- Sharp scissors (fabric scissors if cutting ribbon strips)
- Measuring tape or ruler
- Hot glue gun + glue sticks (mini glue gun is easier to control)
- Optional: small clothespins or binder clips to hold cords in place while you work
- Optional: large-eye yarn needle (helps weave the web neatly)
Optional Rustic Embellishments
- Dried florals (baby’s breath, bunny tails, pampas-style stems): $5–$15
- Mini faux greenery (eucalyptus, olive sprigs): $3–$10
- Wood slices or small tags for names (party favors/place cards): $5–$12
- LED micro fairy lights (battery pack): $6–$15
- Acrylic craft paint or wood stain for hoop tint: $4–$10
Rustic Dream Catcher Design Ideas (Party-Friendly Themes)
1) Boho Neutral Dream Catcher (Perfect for Showers & Birthdays)
- Palette: cream, sand, warm taupe
- Materials: cotton cord web + lace ribbons + wood beads
- Best placement: gift table backdrop or above a dessert stand
2) Woodland Rustic Dream Catcher (Great for Outdoor Parties)
- Palette: moss green, brown, ivory
- Materials: grapevine ring + jute web + small pinecones/dried florals
- Extra touch: a tiny wooden “welcome” tag hanging from the bottom
3) Fall Harvest Dream Catcher (Seasonal Party Décor)
- Palette: rust orange, mustard, cream
- Materials: burlap ribbon + dried wheat stems + copper beads
- Extra touch: wrap hoop with torn muslin dyed with tea for a vintage look
4) Mini Rustic Dream Catcher Party Favors (Quick + Cute)
- Hoop size: 4–6 inches
- Use: hang on favor bags, place settings, or as guest keepsakes
- Personalization: add a name bead or small tag tied to the tail ribbons
Step-by-Step: How to Make a Rustic Dream Catcher
This tutorial creates a classic rustic dream catcher (8–12 inch hoop) that works as DIY party decorations or a handmade gift.
Measurements & Cutting Guide (8–12 inch hoop)
- Hoop wrap cord: 10–15 yards of 1–2 mm jute twine (more if fully wrapping a larger hoop)
- Web cord: 6–10 yards (cotton cord or twine)
- Hanging loop: 12–18 inches of cord
- Tail ribbons/fabric strips: cut 6–10 pieces at 18–30 inches each (mix widths for texture)
Step 1: Prep the Hoop (5–15 minutes)
- Choose your hoop style: metal hoop (modern + sturdy), embroidery hoop (easy), or grapevine ring (extra rustic texture).
- Optional tint: If using raw wood, you can lightly stain it or dry-brush acrylic paint in a muted color. Let dry fully.
- Plan your top: Decide where the hanging loop will sit so your web aligns nicely.
Step 2: Wrap the Hoop (15–35 minutes)
- Tie the twine to the hoop with a tight double knot at the top or side.
- Wrap the twine around the hoop repeatedly, keeping wraps snug and close together.
- Every few inches, add a tiny dot of hot glue on the inside of the hoop to prevent slipping (especially on metal).
- When fully wrapped (or partially wrapped for a more raw look), tie off with a double knot and tuck the end under wraps. Add a small glue dot if needed.
Step 3: Make the Web (25–60 minutes)
This is the classic loop-and-knot style web. A large-eye yarn needle can make threading easier, but it’s optional.
- Anchor the web cord: Tie your web cord to the hoop at the top with a tight double knot, leaving a 3–4 inch tail to tuck later.
- Create the first row of loops:
- Measure about 1.5–2 inches along the hoop.
- Pass cord behind the hoop, pull through to form a loop, then tighten.
- Repeat all the way around, keeping spacing as even as possible.
- Second row and beyond: Instead of looping around the hoop, loop around the midpoint of each previous loop. Keep tension consistent so the web stays centered.
- Add beads (optional): Thread a bead onto the cord, then continue looping. Place beads every 3–5 knots for a rustic, balanced look.
- Finish the center: When the opening is about the size of a quarter, tie a small knot to close and secure. Trim excess and dab a tiny glue dot to lock the knot.
Step 4: Add the Hanging Loop (2–5 minutes)
- Cut a 12–18 inch piece of cord.
- Tie both ends to the hoop at the top, about 1 inch apart, and adjust to make a neat loop.
- Add a small dab of glue on knots for durability (helpful for party setups where décor gets bumped).
Step 5: Create Rustic Tails (10–25 minutes)
- Cut ribbon/fabric strips to 18–30 inches. Use a mix of textures: burlap, lace, muslin, and satin for contrast.
- Fold each strip in half and lark’s head knot it onto the bottom of the hoop (or tie individually for a looser look).
- Thread wood beads onto select ribbons or cords. Tie a small knot under each bead to hold it in place.
- Add feathers by tying them to the ends of a few ribbons or gluing the quill securely. If gluing, wrap the end with a little twine for a finished look.
Step 6: Final Styling (5–15 minutes)
- Trim ribbon ends into V-cuts or angles for a polished finish.
- Fluff and separate strands so they drape nicely.
- If adding dried florals, glue them at the upper side of the hoop in a small cluster (keep it asymmetrical for a modern rustic vibe).
Pro Tips for Better Results (Especially for Party Decorations)
- Keep tension steady: A web that’s too tight can warp the hoop; too loose will sag. Aim for “snug, not strained.”
- Use clips while you work: Binder clips can hold your last loop in place if you need a break.
- Batch craft for parties: Pre-cut ribbon bundles for each dream catcher so assembly goes faster.
- Photogenic placement: Hang dream catchers at eye-level near soft lighting for a great photo booth background.
- Transport-ready: For event décor, place each dream catcher in a large flat box or garment bag to prevent tangles.
Variations (Beginner-Friendly to Advanced)
Beginner-Friendly Adaptations
- Skip full hoop wrapping: Wrap only the top third of the hoop with twine and leave the rest exposed.
- Use a pre-made lace doily as the web: Glue or stitch the doily into the hoop opening for an instant web.
- Make it mini: A 4–6 inch hoop is faster, easier to keep centered, and perfect for party favors.
Intermediate Upgrades
- Double-hoop design: Connect a smaller hoop beneath a larger one with twine-wrapped links for a layered look.
- Color-dipped ribbons: Dip ribbon ends in diluted fabric dye (or watered acrylic) to match party colors.
- Mixed webs: Alternate jute and cotton cord for a two-tone rustic texture.
Advanced Variations
- Macramé center: Replace the traditional web with a small macramé pattern (square knots, spiral knots) for a high-end boho style.
- Floral crescent topper: Build a crescent of dried florals and greenery across the top half of the hoop.
- Lighted dream catcher: Weave micro fairy lights around the hoop and lightly through the web (hide the battery pack behind the ribbon tails or on the back).
Troubleshooting: Fix Common Issues Fast
- My web is off-center: Your loop spacing may be uneven. Gently loosen the tightest area, redistribute loops, and re-tighten. Mini binder clips help hold corrected spacing.
- The hoop is warping: The web is too tight. Loosen the last 1–2 rows slightly and avoid pulling knots hard enough to bend the ring.
- Knots keep slipping: Use cotton cord (less slippery than satin ribbon) and add a tiny dot of hot glue on the final knot only.
- Ribbons tangle easily: Use fewer long strips and mix in slightly stiffer materials (burlap ribbon or thicker cotton). For event day, lightly tie tails together with removable twine for transport.
- Feathers look messy: Trim the quill end neatly, wrap with twine, then glue. Choose a small number of statement feathers rather than too many.
Common Crafting Mistakes to Avoid
- Overloading with heavy décor: Too many beads, thick florals, or lots of charms can pull the hoop out of shape.
- Skipping measuring: Uneven ribbon lengths and inconsistent loop spacing can make the final piece look lopsided—measure once, then batch cut.
- Using weak glue for mixed materials: Hot glue is great for quick hold, but for heavier add-ons (wood slices, big floral clusters), reinforce with extra wraps of twine or a stronger craft adhesive if you have it.
- Cutting ribbons too short: Longer tails look more dramatic for party backdrops. When in doubt, cut 24–30 inches and trim after hanging.
- Pulling the web too tight: Snug is good; strained is not. A gentle, consistent tension keeps the web neat and the hoop round.
FAQ: Rustic Dream Catchers for DIY Party Decorations
1) What size hoop is best for party décor?
For a statement piece behind a dessert table, choose 12–18 inches. For chair décor, aisle markers, or clustered wall arrangements, 8–12 inches works beautifully. For party favors, stick with 4–6 inches.
2) Can I make rustic dream catchers without feathers?
Yes. Swap feathers for tassels, macramé fringe, extra ribbon tails, or dried florals. It still reads rustic and works well for wedding or baby shower themes.
3) How do I match dream catchers to my party color palette?
Choose one neutral base (jute + cream cotton), then add 1–2 accent colors through ribbon strips, beads, or a small floral cluster. For cohesive DIY party decorations, repeat the same ribbon set across all dream catchers.
4) How far in advance can I make them?
You can make them 2–4 weeks ahead. Store them flat or hanging, and keep them away from humidity to protect dried florals and prevent ribbon creasing.
5) What’s the easiest way to hang dream catchers at an event?
Use clear command hooks for indoor walls, zip ties for fences/arbors, or fishing line from a backdrop stand. For outdoor parties, add a little extra weight (like a bead cluster) so they don’t flip in the breeze.
6) Are dream catchers safe for kids’ crafting parties?
They can be, with adjustments: use blunt scissors, skip hot glue (use tacky glue with drying time), and choose larger beads for easier handling. Adult supervision is recommended, especially with small parts.
Wrap-Up: Make Rustic Dream Catchers Your Signature Handmade Decor
Rustic dream catchers are a satisfying DIY craft because you see progress quickly, they’re forgiving for beginners, and the final result looks beautifully styled with minimal cost. Make one bold statement piece for your party backdrop or create a whole matching set for a coordinated handmade look.
Try a simple neutral version first, then experiment with layered hoops, macramé textures, or dried florals to match your next celebration. When you’re ready for more DIY crafts, party decorations, and handmade project ideas, explore more tutorials and inspiration on smartpartyprep.com.
More Articles
 Kids' Craft: Table Runners
 30 Creative Party Banner Ideas
 How to Accept 3rd Party Cookies on Mac in 2024: A Step-by-Step Safari & Chrome Guide (No Tech Degree Required)
 Easy Balloon Arches for Beginners
 What Is a Third Party Adapter? The Hidden Risks (and Real Savings) You’re Ignoring When Charging Your Laptop, Camera, or EV — Here’s How to Spot the Safe Ones in Under 60 Seconds
 Stop Struggling with 'When the Party's Over' Guitar Chords: The Exact 4-Chord Progression (with Capo-Free & Beginner-Friendly Versions) That 92% of Learners Miss — Free Printable Chart Inside
 How to Hang Party Streamers Without Tape Marks, Sagging, or Last-Minute Panic: 7 Foolproof Methods (Tested on 37 Parties)
 DIY Balloon Arches for Anniversaries
 How to Unlock Mario Party 8 Characters: The Only Step-by-Step Guide That Actually Works (No Cheats, No Glitches, Just Verified Methods)
 Kids' Craft: Wreaths