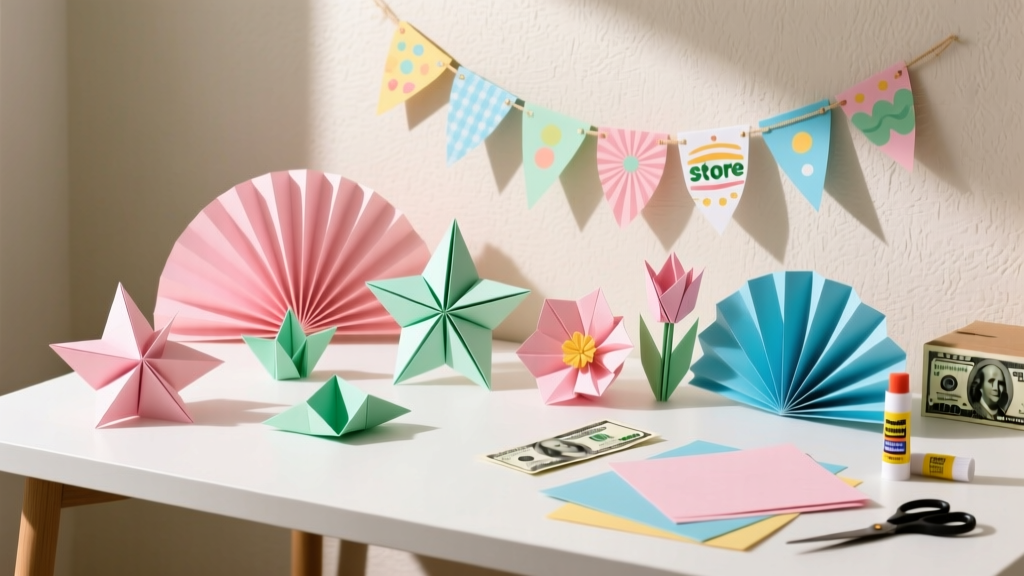
DIY Origami Decorations with Dollar Store Supplies
Origami is one of those magical crafts that looks fancy but can be surprisingly budget-friendly—especially when you pair it with dollar store supplies. With a few simple folds and a little patience, you can create handmade party decorations that feel custom, coordinated, and totally “wow” when guests walk in.
Even better: origami décor is lightweight, easy to hang, and perfect for last-minute party styling. Whether you’re planning a birthday, baby shower, graduation, or holiday gathering, these DIY paper decorations can match any theme just by switching up colors and patterns.
This guide walks you through several beginner-friendly origami party decorations using affordable materials, plus advanced variations if you’re ready to level up your folding skills.
Project Overview: Skill Level, Time, and Best Party Uses
- Skill level: Beginner to Intermediate (with advanced options included)
- Total time: 60–120 minutes for a small set (varies by quantity)
- Best for: Birthdays, bridal showers, baby showers, graduations, holiday parties, classroom events
- Style vibes: Modern, whimsical, elegant, minimal, colorful, themed
Quick planning tip: For a standard party table backdrop, aim for 12–20 pieces (a mix of stars + flowers + cranes) depending on size and how “full” you want it to look.
Dollar Store Materials List (with Estimated Costs)
You can find most of these items at Dollar Tree, Dollar General, Five Below, or any local discount shop. Prices vary by location, but this gives a realistic budget.
Paper & Decorative Basics
- Scrapbook paper pads (12" x 12", 24–48 sheets) – $1.25–$5
- Gift wrap sheets (thin paper, great for big folds) – $1.25–$3
- Tissue paper (for layered looks) – $1.25
- Solid-color cardstock (for sturdy stars/flowers) – $1.25–$3
Adhesives & Hanging Supplies
- Glue stick (cleanest for paper) – $1.25
- Double-sided tape (fast and neat) – $1.25–$3
- Clear tape – $1.25
- Twine, ribbon, or clear fishing line (for hanging) – $1.25–$3
- Mini clothespins or paper clips (optional for garlands) – $1.25
Tools (Recommended)
- Scissors (sharp for clean cuts) – $1.25–$3
- Ruler (12" or longer) – $1.25
- Pencil – $1.25
- Bone folder (optional but amazing for crisp folds) – $3–$8 (craft aisle) or use an old gift card for free
- Hole punch (single hole) – $1.25
Total estimated cost: $8–$20 depending on what you already have and how many decorations you’re making.
Prep Steps for Crisp, Professional-Looking Origami
Choose the Right Paper (It Makes Folding Easier)
- Best for beginners: Scrapbook paper (not too thick, not too flimsy)
- Best for tiny stars: Gift wrap or thin craft paper strips
- Best for sturdy hanging décor: Medium cardstock (but folds are harder—score folds gently first)
Cut Perfect Squares (Fast Method)
Many origami models start with a square. If your paper isn’t already square:
- Start with a rectangle (like 8.5" x 11").
- Fold one corner diagonally to form a triangle (align edges precisely).
- Trim off the extra rectangle strip.
- Unfold to reveal a perfect square.
Recommended sizes:
- 6" x 6" for garlands and clusters
- 8" x 8" for statement pieces
- 12" x 12" for large wall décor (works best with thinner paper)
DIY Origami Decoration #1: Lucky Origami Stars (Perfect for Table Scatter or Fillers)
Skill level: Beginner
Time estimate: 2–4 minutes per star after you get the hang of it
Best party uses: Table scatter, balloon stuffing, favor bags, centerpiece filler
What You’ll Need
- Paper strips: 1/2" wide x 10" long (cut from gift wrap, scrapbook paper, or thin cardstock)
- Scissors
Step-by-Step Instructions
- Make a knot: Tie an overhand knot near one end of the strip, but don’t pull tight right away.
- Flatten into a pentagon: Gently pull the knot snug, then flatten it so it forms a neat 5-sided shape.
- Tuck the short tail: Fold the short end around the pentagon edge and tuck it into a pocket if possible.
- Wrap the long tail: Wrap the long strip around the pentagon, following the edges. Keep it snug and flat.
- Finish and tuck: When you reach the end, tuck the remaining tail into a pocket on the pentagon.
- Puff the star: Pinch the center of each side inward to create the star points. Rotate and repeat until puffy.
Party Styling Ideas
- Fill clear ornament balls with stars for a party display.
- Sprinkle on a dessert table runner for a confetti look (paper won’t melt like real confetti can).
- Make 50–100 in theme colors and place them in small candy cups as table décor.
DIY Origami Decoration #2: Origami Crane Garland (Classic, Elegant, and Surprisingly Easy)
Skill level: Beginner to Intermediate
Time estimate: 6–10 minutes per crane (faster with practice)
Best party uses: Backdrops, doorway strands, photo booth walls, chair décor
What You’ll Need
- Square paper: 6" x 6" or 8" x 8"
- Hole punch or needle (for threading)
- Twine, fishing line, or ribbon
- Optional: beads (dollar store jewelry aisle) to space cranes
Step-by-Step Instructions (Crisp, Beginner-Friendly)
- Start with the colored side down (if your paper is two-sided).
- Make key creases: Fold diagonally corner-to-corner both ways, then unfold. Fold in half both directions, then unfold.
- Collapse into a triangle base: Bring opposite corners together so the paper collapses into a smaller square/diamond shape (a classic origami base).
- Form the kite shape: Fold the lower left and right edges toward the center line. Fold the top triangle down to crease, then unfold those three folds.
- Inside reverse fold: Lift the top layer and open it upward, using the creases you made to flatten into a long diamond (this is the “bird base” step).
- Repeat on the back: Flip and repeat the same kite fold + lift/flatten step.
- Create neck and tail: Fold the two thin “legs” up at an angle. Choose one side for the head and make a small inside reverse fold at the tip to form the beak.
- Make wings: Fold the wings down so they sit symmetrically.
How to Turn Cranes into a Garland
- Method A (best): Thread a needle with fishing line and pass through the crane’s body center. Tie a small knot under each crane or use a bead to keep spacing.
- Method B (no needle): Hole punch a tiny hole at the top of the body and thread twine through. Reinforce with a dot of tape.
Measurement idea: For a 6-foot garland, plan for 10–14 cranes spaced 4–6 inches apart.
DIY Origami Decoration #3: Modular Origami Flower Wall Clusters (Statement-Making on a Budget)
Skill level: Intermediate (easy folds, more steps)
Time estimate: 10–15 minutes per flower (plus assembly time)
Best party uses: Dessert table backdrop, wall décor, gift table sign area
What You’ll Need
- Square paper: 5" x 5" to 8" x 8" (make 5 or 6 petals per flower)
- Glue stick or double-sided tape
- Optional: button/brad/sticker gem for the center
Step-by-Step Instructions (Simple Petal Module)
- Fold diagonally: Fold the square corner-to-corner into a triangle.
- Bring corners up: Take the two bottom corners of the triangle and fold them up to the top point, forming a diamond shape.
- Fold the flaps down: Fold the left and right top flaps outward/down to create a petal look (you’re shaping the “cone”).
- Create a glue tab: Slightly overlap one side behind the other so the petal forms a cone. Secure with a glue stick or a small strip of double-sided tape.
- Repeat: Make 5 petals for a simple flower or 6 petals for a fuller look.
- Assemble: Glue petals edge-to-edge in a circle. Hold for 20–30 seconds to set.
- Add a center: Cover the middle with a paper circle, sticker gem, or button.
How to Hang Flower Clusters
- Use removable adhesive hooks and tie flowers with ribbon loops.
- For lightweight paper: roll small tape loops and press to the wall.
- For a foam board backdrop: pin or tape from behind for a clean look.
Pro Tips, Variations, and Troubleshooting
Pro Tips for Clean Folds
- Score thick paper lightly with a ruler edge or the back of a butter knife (gentle pressure) before folding.
- Crease sharply: Run a bone folder (or gift card) along each fold for crisp lines.
- Work on a hard surface (tabletop beats carpet every time).
- Batch your steps: Cut all squares/strips first, then fold assembly-line style.
Beginner-Friendly Adaptations
- Start with 6" x 6" paper (bigger is easier to control).
- Use single-color paper to make folds easier to track.
- Make a mixed décor set: 10 lucky stars + 6 cranes + 3 flowers. It looks intentional without requiring tons of one model.
Advanced Variations (When You’re Ready)
- Ombre garlands: Arrange cranes from light-to-dark across a 6–8 foot strand.
- Double-layer flowers: Make two flowers (one slightly smaller) and glue the smaller on top for dimension.
- Two-tone cranes: Use double-sided paper or lightly glue two thin papers back-to-back before folding.
- LED sparkle effect: Weave micro LED fairy lights behind hanging origami for photo-ready backdrops.
Troubleshooting Guide
- My crane won’t flatten neatly: Your base creases may be off-center. Re-crease the diagonals and halves carefully, then collapse again.
- My lucky stars keep popping open: The final tuck isn’t deep enough. Use slightly longer strips (10–11 inches) and tuck firmly into a pocket.
- My flower petals won’t stick: Switch to double-sided tape for faster hold, or add a small binder clip for 1 minute while glue sets.
- Paper is tearing at folds: Your paper is too thick or you’re pressing too hard. Use thinner paper or score gently first.
Common Crafting Mistakes to Avoid
- Cutting uneven squares: Even small size differences make modular projects look messy. Measure and cut carefully (or use a paper trimmer if you have one).
- Rushing the first creases: Origami builds on early folds. If the first folds are crooked, everything after will be harder.
- Using overly glossy paper: Some gift wrap is slippery and won’t hold creases well. Test one piece before cutting a whole stack.
- Over-gluing: Too much glue warps paper. Use a thin swipe of glue stick or small pieces of tape.
- Hanging without planning spacing: Lay out your garland on the floor first and mark spacing so it looks balanced on the wall.
- Not making extras: For party decorating, plan for 10–20% extra pieces (especially stars and cranes) in case one tears or you want a fuller look.
FAQ: DIY Origami Party Decorations
1) What’s the best dollar store paper for origami?
Scrapbook paper and lighter craft paper are usually the easiest for DIY origami decorations. Gift wrap works great for lucky stars and large pieces, but test it—some glossy wraps don’t crease well.
2) How far in advance can I make origami decorations?
You can make them 1–4 weeks ahead. Store finished pieces in a shoebox or lidded bin with tissue paper between layers. Keep them dry and out of direct sun to prevent fading.
3) How do I keep origami from drooping on a backdrop?
Use slightly thicker paper (like scrapbook paper), crease firmly with a bone folder, and hang with fishing line for less visual weight. For cranes, a small bead above each crane helps keep spacing and prevents sliding.
4) Can kids help with these DIY paper decorations?
Yes! Lucky stars are great for kids (ages 7+ with help), and simple petal flowers work well for group crafting. Cranes are better for teens or adults unless you’re guiding step-by-step.
5) What’s a good quantity to make for a party?
For a medium party setup, try:
- 30–60 lucky stars for tables and fillers
- 8–14 cranes for one 6-foot garland
- 3–7 flowers for a wall cluster or dessert table backdrop
6) How do I match origami décor to my party theme?
Pick 2–3 main colors and one accent pattern (polka dots, metallic, florals). Repeat those choices across cranes, stars, and flowers for a cohesive handmade party decoration look.
Ready to Fold Your Way to a Prettier Party?
With a couple of paper packs and basic tools, you can create DIY origami decorations that look polished, personal, and party-ready—without blowing your budget. Start with a small set, practice a few folds, then build a full garland or backdrop once you find your rhythm.
When you’re done, snap a photo of your setup (origami looks amazing in party pics), and keep the extras for future celebrations. Handmade decorations like these aren’t just affordable—they turn your event into something memorable.
Looking for more party-ready DIY crafts and handmade decoration ideas? Explore more creative projects on smartpartyprep.com and keep the celebration inspiration going.
More Articles
 Seasonal Masks Ideas
 What Is 'A Party of Patches'? The Surprisingly Viral DIY Crafter’s Guide to Hosting a Low-Stress, High-Joy Fabric-Fueled Gathering That Builds Community (Not Just Quilts)
 How to Unblock 3rd Party Session Cookies on Mac: A Step-by-Step Safari & Chrome Fix That Actually Works (No Extensions Needed)
 Seasonal Invitations Ideas
 How to Make a Backdrop for a Party in Under 90 Minutes (No Sewing, No Pro Tools — Just Dollar Store Supplies & 5 Foolproof Steps)
 Kids' Craft: Wreaths
 How to Allow Third Party Cookies on a Mac in 2024: A Step-by-Step Safari & Chrome Guide (No Tech Degree Required)
 Easy Tie-Dye Shirts for Beginners
 How Do You Make Party Hats That Actually Stay On? (No Glue Gun, No Tears — Just 3 Foolproof Methods Using Stuff You Already Have)
 How to Make Confetti at Home