Wine Tasting Seating Arrangement Ideas
A wine tasting can feel effortless to guests—good pours, great conversation, a few “Where did you find this?” moments. Behind the scenes, the experience is shaped by layout decisions that either support smooth hosting or create bottlenecks, awkward crowding, and missed pairing notes. Your seating arrangement is one of the biggest drivers of flow, guest interaction, and how “premium” the event feels.
Whether you’re planning a casual backyard tasting, a corporate client night, or a milestone celebration, the right seating plan helps you control pacing, keep tasting order consistent, and ensure guests can comfortably compare wines. It also makes service easier for your team, reduces spills, and creates a social energy that matches your event goal—networking, education, or pure fun.
This guide walks you through practical wine tasting seating arrangement ideas, step-by-step planning timelines, budget considerations, vendor selection tips, and common mistakes to avoid—so you can host a wine tasting event that runs like a well-managed production while still feeling relaxed.
Start With the Event Goal: Social, Educational, or Hybrid
Before choosing a floor plan, define the purpose of the tasting. Seating isn’t just where people sit—it’s how they interact.
- Social tasting (mixer vibe): Prioritize flexible seating, standing cocktail tables, and mingling zones.
- Educational tasting (guided): Prioritize sightlines, note-taking space, and structured seating by flights.
- Hybrid: Start guided, then transition to mingle seating for dessert or “favorites re-pour.”
Real-world example: A 24-person birthday wine tasting often works best as a hybrid: a 45-minute guided tasting seated at two long tables, followed by open mingling around a charcuterie board and a “top pick” station.
Key Seating Arrangement Options (With Pros, Cons, and Best Uses)
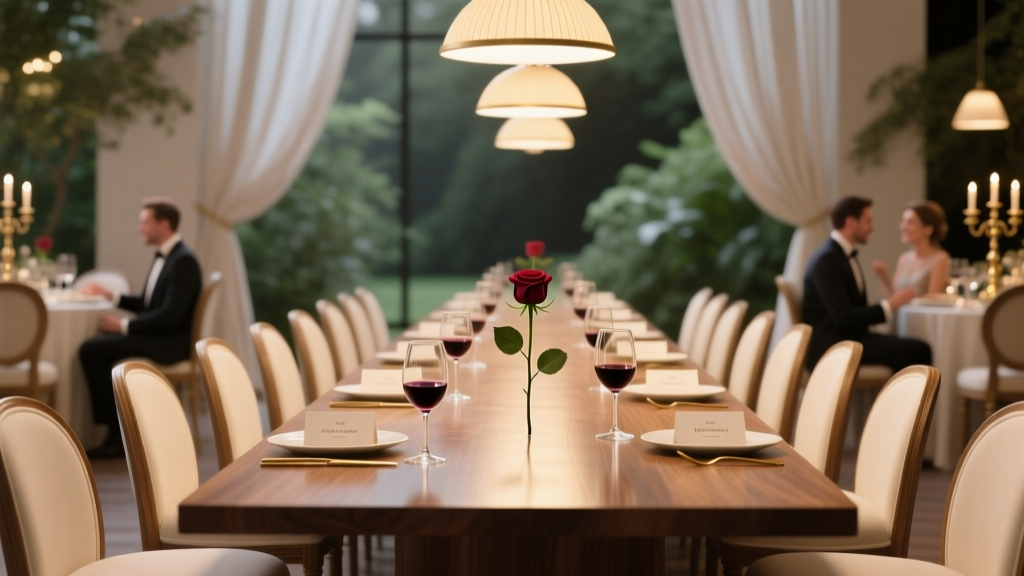
1) Long Communal Table (Family-Style)
Best for: Home tastings, wine club nights, rustic or “hosted dinner party” style events
- Pros: Easy to create a cohesive atmosphere; guests naturally talk across; minimal furniture needs.
- Cons: Service can be slower if pours happen from one end; guests in the middle may feel “stuck” if space is tight.
- Layout tip: Leave 36–42 inches clearance behind chairs for server movement.
2) Rounds (Cabaret-Style or Full Rounds)
Best for: Corporate events, fundraising tastings, venues with banquet inventory
- Pros: Great for conversation in small groups; familiar banquet format; easy to assign seats and manage dietary items if food is served.
- Cons: Harder for guests to see the presenter without staging; can feel “formal” unless styled intentionally.
- Layout tip: Use cabaret seating (chairs on 2/3 of the round, open side facing the presenter) to improve sightlines.
3) U-Shape or Horseshoe Setup
Best for: Guided tastings with a sommelier or host-led instruction
- Pros: Strong sightlines; presenter can move inside the U; guests feel included.
- Cons: Requires more square footage; tricky for large groups.
- Layout tip: Place the tasting bottles and a small demo table at the open end for clear visibility.
4) Classroom-Style Rows
Best for: Education-forward tastings, winery training events, larger groups
- Pros: Efficient use of space; great for note-taking; easy to standardize place settings.
- Cons: Less social; people talk mostly to neighbors.
- Layout tip: Add a networking break after Flight 2 and transition to lounge/cocktail seating to re-energize the room.
5) Cocktail Reception With Tasting Stations
Best for: Open-house tastings, gallery-style events, brand launches
- Pros: High energy; guests control pacing; easy to scale up; great for mingling.
- Cons: Guests may taste out of order; lines can form; note-taking is harder without surfaces.
- Layout tip: Provide high-top tables every 6–8 guests and set stations in a logical tasting route (light to bold).
6) “Pods” or Neighborhood Seating
Best for: Mixed groups (friends + coworkers), interactive games, themed tastings
- Pros: Encourages small-group comfort; easy to assign by personality or networking goals; supports team-style activities.
- Cons: Requires more planning for equal service across pods.
- Layout tip: Create 4–6 person pods with a shared water carafe, dump bucket, and snack bowl to reduce server trips.
Seating Chart Strategies That Make Hosting Easier
Group Guests Intentionally
Modern event planning trends emphasize curated guest experiences—including seating that supports connection. Use these approaches:
- Balance talkers and listeners: Avoid clustering all high-energy guests together.
- Mix familiarity: Seat pairs who know each other, then connect pods through one “bridge” guest.
- Consider accessibility: Place guests with mobility needs near the entrance, restroom, and a clear path to seating.
- Mind sensory preferences: Keep guests sensitive to noise away from speakers/bar traffic.
Use the “Service Lanes” Rule
For smooth event coordination, plan pathways first, then place tables.
- Main aisle: 48 inches wide (ideal) for servers carrying trays.
- Secondary aisles: 36 inches minimum.
- Behind chairs: 36–42 inches for comfortable pushback and pass-through.
Assign Seats vs. Open Seating
- Assigned seating: Best for guided tastings, VIP groups, or when you need controlled pacing. Add place cards and a printed tasting mat at each seat.
- Open seating: Best for casual tastings and drop-in events. Use extra signage and staff direction to prevent crowding.
Place Setting Essentials (What Each Seat Needs)
A polished wine tasting setup is all about what’s within reach. For each guest seat, plan:
- 1–2 wine glasses minimum (ideal: 3–4 for flights, or a rinse station if reusing)
- Water glass + water carafe per table
- Dump bucket or discreet spittoon (1 per 4–6 guests)
- Napkin + small plate (for crackers/cheese)
- Tasting mat or placemat (labels for Flight 1, 2, 3)
- Pen/pencil and tasting notes card
- Optional: aroma wheel, scorecard, or QR code to digital notes
Trend watch: Many hosts now offer a QR code tasting guide that includes wine facts, pairings, and a “favorite” vote. It reduces printing and helps guests remember what they loved.
Step-by-Step Planning Timeline (With Checklist)
3–4 Weeks Before: Define the Format and Floor Plan
- Choose tasting style: guided seated, station-based, or hybrid
- Set guest count and ideal table sizes (4–6 per pod is easiest)
- Select venue room and measure usable space
- Decide if you’ll serve food pairings or light bites
- Create a preliminary seating plan (even a simple spreadsheet works)
2 Weeks Before: Lock Vendors and Rentals
- Finalize wine list and tasting order (sparkling/white → rosé → light red → bold red → dessert)
- Confirm glassware needs and reserve rentals if required
- Hire staff if needed (1 server per 12–15 guests for seated pours; 1 per 25 for stations)
- Order printed materials: place cards, tasting mats, signage
- Confirm table and chair inventory; book linens if elevating look
1 Week Before: Build the Seating Chart and Run of Show
- Assign seats (or table groups) based on goals: networking, comfort, family clusters
- Create a “host map” with table numbers and any notes (VIP, allergies, accessibility)
- Draft a run of show:
- Guest arrival + welcome pour
- Flight 1 + brief intro
- Flight 2 + pairing bites
- Break + water refresh
- Flight 3 + favorites vote
- Open re-pour + social time
- Purchase non-alcohol essentials: water, crackers, ice, dump buckets, pens
48–72 Hours Before: Prep and Confirm Everything
- Confirm vendor arrival times and load-in instructions
- Print backup copies of seating chart and tasting list
- Pre-sort place cards by table for fast setup
- Stage wine by flight, label boxes, and chill whites/rosé
- Test lighting and music volume (avoid overpowering conversation)
Event Day: Setup Sequence (Fast and Foolproof)
- Mark service lanes and station locations with painter’s tape
- Place tables and chairs, then confirm clearances
- Set linens, centerpieces (keep low), and place settings
- Set water first (it reduces last-minute scramble)
- Set glasses and tasting mats
- Set signage: welcome sign, tasting order, restrooms, spittoon reminder
- Do a 10-minute staff briefing: pour sizes (2 oz), pacing, and guest flow
Budget Considerations (Sample Breakdown)
Wine tastings can scale from budget-friendly to luxury. Use this sample breakdown for planning:
- Wine: 35–55% of budget
- Rule of thumb: 2 oz pours × 5 wines = 10 oz per guest (plus buffer)
- Plan 1 bottle per 6–8 guests for a 5-wine tasting (varies by pour size and re-pours)
- Food/Pairings: 15–25% of budget
- Rentals (glassware, tables, linens): 10–20% of budget
- Staffing (servers/bartender/sommelier): 10–25% of budget
- Print/signage/decor: 5–10% of budget
Cost-saving tip: Keep the seating elevated with intentional styling (linen runners, candles, minimal florals) and use one great glass per guest with a rinse station instead of multiple glass types.
Vendor Selection Tips (Wine, Staffing, Rentals)
Wine Source: Retailer, Distributor, Winery, or Sommelier
- Retailer: Great for smaller tastings; ask about case discounts and buyback policies (where legal).
- Winery direct: Ideal for themed tastings; may include brand educator support.
- Sommelier/host: Adds structure and storytelling; helpful for corporate events and elevated private parties.
Questions to ask:
- Can you recommend a tasting progression and food pairing notes?
- How many staff are needed for seated pours vs. stations?
- Do you provide glassware, dump buckets, or tasting mats?
- What’s your plan for temperature control and bottle staging?
Rentals and Setup Support
- Confirm glassware style and quantity (plus 10% extra for breakage)
- Ask about delivery windows and pickup timing
- Request a floor plan preview for larger rentals
Common Wine Tasting Seating Mistakes (And How to Fix Them)
- Overcrowding the room: If chairs are tight, guests won’t relax. Fix: reduce guest count or switch to cocktail tables + stations.
- Centerpieces that block sightlines: Tall florals look great but disrupt guided tastings. Fix: keep decor low and candle-forward.
- No surfaces for notes: Guests can’t track wines without space. Fix: add high-tops or clipboards for station-style events.
- Poor tasting flow: Guests taste bold reds first and everything after feels muted. Fix: post a clearly marked tasting route and train staff to guide progression.
- Not enough water or dump buckets: Leads to messy tables and faster intoxication. Fix: 1 water carafe per table and 1 dump bucket per 4–6 guests.
- Forgetting acoustics: A speaker too close to a table ruins conversation. Fix: keep music background-level and position speakers away from seating clusters.
Real-World Seating Plans You Can Copy
Plan A: 16 Guests, Guided Home Tasting
- Two 8-foot tables in parallel, 4 guests per side
- Service lane between tables: 48 inches
- Host station at front with bottles in flight order
- Transition: after Flight 3, move desserts to a separate counter to encourage mingling
Plan B: 40 Guests, Corporate Networking Tasting
- 5 high-top cocktail tables (6–8 guests per table area)
- 3 tasting stations by wine style (white/rosé, light red, bold red)
- 1 water station and 1 “notes” station with pens + cards
- Directional signage to prevent station crowding
Plan C: 24 Guests, Educational U-Shape
- U-shape of three 6-foot tables
- Presenter inside the U, small demo table at the open end
- Place settings include tasting mat and 2 glasses per guest
- Pairings staged on sideboard to keep tables uncluttered
FAQ: Wine Tasting Seating and Planning
How much space do I need per guest for a seated wine tasting?
Plan for 24–30 inches of table width per guest for comfort (glasses, notes, small plate). Also allow 36–42 inches behind chairs for movement.
Should I assign seats at a wine tasting?
If you’re running a guided tasting with a set schedule, assigned seating keeps the event organized and supports better pacing. For casual open-house tastings, open seating works well if you add enough high-top tables and clear signage.
How many wines are ideal for a tasting event?
Most events land well with 4–6 wines. That’s enough variety without fatigue. If you’re doing 7–8 wines, use smaller pours, add a water break, and keep the seating comfortable for note-taking.
What’s the best seating setup for mingling?
Use cocktail tables plus lounge clusters, then add tasting stations in a clear flow. Guests need places to set down glasses—high-tops are the easiest fix for crowded hands.
Do I need spit buckets at a private wine tasting?
They’re strongly recommended, even for social tastings. Provide at least one discreet dump bucket per 4–6 guests, plus a water rinse option. It keeps the experience cleaner and more professional.
How do I keep lines from forming at tasting stations?
Split stations by wine style, duplicate the most popular station, and place water/food away from the pour area. Also, stagger station placement so guests naturally spread out rather than clustering at the entrance.
Next Steps: Build Your Seating Plan With Confidence
Choose the seating arrangement that supports your event goal, map service lanes before placing tables, and set each seat for comfort: water, a place to take notes, and a clear tasting order. Once the layout is right, the rest of the event planning—timing, staffing, and guest experience—gets dramatically easier.
If you’re ready to keep planning, explore more event planning checklists, party organization templates, and coordination tips at smartpartyprep.com.
More Articles
 What Is a Stagette Party? (And Why Your Guest List, Budget & Timeline Are Already at Risk If You Don’t Clarify This First)
 What Is the Whig Party? The Surprising Truth Behind America’s First Major Opposition Party — And Why Its Collapse Still Shapes U.S. Politics Today
How to Buy Car Private Party Without Getting Scammed: The 7-Step Safety Checklist Every First-Time Buyer Misses (And Why Skipping #3 Costs $2,800 on Average)
How to Beat Pogo Party PVZ in Under 90 Seconds: The Exact Plant Combo, Timing Windows, and Sun-Management Tricks Top 0.3% Players Use (No RNG Reliance)
What Is the Whig Party? The Surprising Truth Behind America’s First Major Opposition Party — And Why Its Collapse Still Shapes U.S. Politics Today
How to Buy Car Private Party Without Getting Scammed: The 7-Step Safety Checklist Every First-Time Buyer Misses (And Why Skipping #3 Costs $2,800 on Average)
How to Beat Pogo Party PVZ in Under 90 Seconds: The Exact Plant Combo, Timing Windows, and Sun-Management Tricks Top 0.3% Players Use (No RNG Reliance)
 Do I Bring Gift to Gender Reveal Party? The Unbiased, Stress-Free Etiquette Guide (No More Awkward Guesswork)
What Political Party Is Adam Sandler? The Truth Behind His Quiet Stance, Past Donations, Public Appearances, and Why He’s Deliberately Avoided Labeling Himself—Despite Years of Speculation and Misinformation
Do I Bring Gift to Gender Reveal Party? The Unbiased, Stress-Free Etiquette Guide (No More Awkward Guesswork)
What Political Party Is Adam Sandler? The Truth Behind His Quiet Stance, Past Donations, Public Appearances, and Why He’s Deliberately Avoided Labeling Himself—Despite Years of Speculation and Misinformation
 How to Handle Weather for Outdoor a Film Screening
What Is the First Party System? You’re Probably Confusing It With Modern Politics — Here’s the Real Origin Story, Key Players, Collapse Timeline, and Why It Still Shapes Today’s Two-Party Duopoly
Do You Wrap Gifts for a Favorite Things Party? The Truth About Presentation, Practicality, and What Guests *Actually* Expect (Spoiler: It Depends on Your Theme, Guest Age, and Time Budget)
How to Handle Weather for Outdoor a Film Screening
What Is the First Party System? You’re Probably Confusing It With Modern Politics — Here’s the Real Origin Story, Key Players, Collapse Timeline, and Why It Still Shapes Today’s Two-Party Duopoly
Do You Wrap Gifts for a Favorite Things Party? The Truth About Presentation, Practicality, and What Guests *Actually* Expect (Spoiler: It Depends on Your Theme, Guest Age, and Time Budget)
 How Did the British Respond to the Boston Tea Party? The Coercive Acts, Naval Blockade, and Political Fallout That Changed Everything — A Step-by-Step Breakdown for Educators & Event Planners