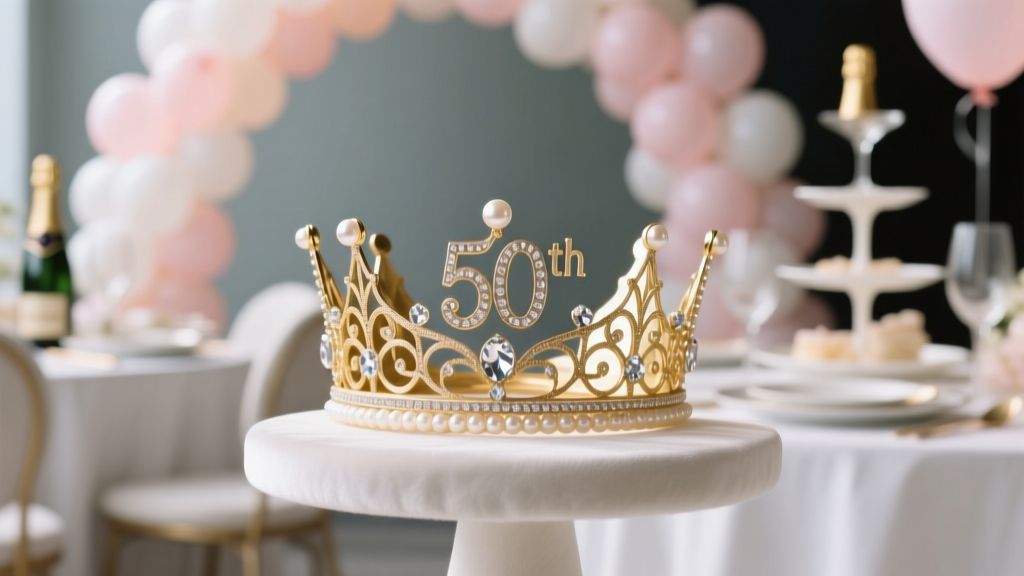
DIY Crowns for 50th Birthdays: Party-Perfect Headpieces, Supplies, and Easy How-Tos
Turning 50 deserves a little extra sparkle—and nothing says “guest of honor” like a crown. DIY crowns for 50th birthdays are the kind of party detail that instantly upgrades photos, sets a playful mood, and makes the birthday star feel celebrated from the first hello to the last slice of cake.
Whether you’re planning a glam gold soirée, a backyard brunch, or a surprise party with friends and family, a well-made crown doubles as party décor and a wearable keepsake. Plus, it’s a budget-friendly way to lean into popular trends like metallics, rhinestones, personalized party details, and photo-ready accessories—without spending a fortune on custom boutique pieces.
Below you’ll find crown styles, supply lists, step-by-step DIY options, quantity and budget guidelines, and smart party setup tips—so your 50th birthday decorations feel cohesive, festive, and totally camera-ready.
Why DIY Crowns Are a Must-Have for a 50th Birthday Party
- They spotlight the guest of honor: A crown is an instant “birthday VIP” marker, especially helpful at larger events.
- They boost your party photos: Crowns add height, sparkle, and a focal point in pictures—perfect for a photo booth or selfie station.
- They tie into your theme: Gold, black-and-gold, rose gold, disco, “Cheers to 50,” or elegant floral—crowns can match any party theme.
- They’re customizable: Add “50,” the name, a funny title (“Queen of 50”), or even small nods to hobbies (gardening, travel, sports).
- They’re easy to scale: Make one deluxe crown for the birthday person and simpler versions for guests, the “court,” or party crew.
Choose Your Crown Style: 7 DIY Ideas That Look Store-Bought
1) Classic Metallic “50” Tiara (Fast + Glam)
This is the easiest DIY: a metallic tiara base with a bold “50” centerpiece. Great for black-and-gold or all-gold party supplies.
- Best for: Formal parties, cocktail nights, milestone photo moments
- Time: 10–20 minutes
- Skill level: Beginner
2) Rhinestone & Pearl Statement Crown (Ultra Photo-Ready)
If you want that “birthday royalty” effect, go with rhinestones and pearls. It pairs beautifully with champagne, blush, and rose gold décor trends.
- Best for: Glam themes, dinner parties, ballroom vibes
- Time: 45–75 minutes
- Skill level: Intermediate
3) Floral Crown (Fresh or Faux, Always Pretty)
Floral crowns work for garden parties, brunches, and outdoor celebrations. Faux flowers are the most durable (and budget-friendly over time), while fresh blooms feel special and fragrant.
- Best for: Brunch, backyard, boho, spring/summer celebrations
- Time: 30–60 minutes
- Skill level: Beginner to intermediate
4) Disco-Inspired Mirror Tile Crown (Trendy + Fun)
Disco balls are a huge party trend, and a mini disco crown ties into that vibe instantly. Think silver mirror tiles, glitter, and metallic fringe.
- Best for: Dance parties, “Studio 50” themes, 70s/80s throwbacks
- Time: 45–90 minutes
- Skill level: Intermediate
5) Minimalist Gold Leaf Crown (Chic + Lightweight)
A gold leaf crown looks elegant and high-end without a heavy build. Great for people who don’t usually wear headpieces but still want something special.
- Best for: Modern themes, simple décor, minimalist table styling
- Time: 20–40 minutes
- Skill level: Beginner
6) “Crown Headband” (Comfort First)
If comfort is priority, build on a padded headband. It stays put through hugs, dancing, and photos.
- Best for: Long events, active parties, outdoor settings
- Time: 20–45 minutes
- Skill level: Beginner
7) Group Crowns for the “Birthday Court” (Party Crew Perk)
Make one deluxe crown for the 50-year-old and smaller crowns or tiaras for best friends/siblings. It’s a fun icebreaker and makes group photos feel coordinated.
- Best for: Surprise parties, family gatherings, milestone trips
- Time: 30–60 minutes (assembly line style)
- Skill level: Beginner
DIY Crown Supply List (With Product Recommendations)
These are the go-to party supplies and craft materials that make crowns sturdy, comfortable, and camera-ready. Prices vary by season and retailer, but the ranges below are realistic for most U.S. shoppers.
Essential Bases
- Metal tiara/crown blanks ($6–$18 each) – Amazon, Etsy, Party City (selection varies), craft stores like Michaels/JOANN
- Plastic tiaras (bulk packs) ($10–$22 for 6–12) – Amazon, Walmart, Oriental Trading
- Headbands (plain, padded, or satin) ($6–$15 for 4–10) – Amazon, Target, craft stores
- Floral wire + floral tape ($5–$12) – Michaels, JOANN, Amazon
Sparkle & Statement Add-Ons
- Rhinestone sticker sheets/strips ($5–$15) – Amazon, Michaels, Walmart
- Pearl bead strands ($6–$14) – Amazon, craft stores
- Glitter cardstock or foam sheets ($5–$12) – Michaels, Target, Amazon
- Mini mirror tiles (for disco crowns) ($8–$18) – Amazon, craft stores
- Metallic letter/number stickers (“50”) ($4–$10) – Amazon, Michaels, Target
Tools & Adhesives (Worth Buying Once)
- Hot glue gun + glue sticks ($10–$25) – Amazon, Walmart, Michaels
- E6000 or strong craft adhesive ($6–$10) – Amazon, Michaels (best for metal-on-metal; allow cure time)
- Wire cutters + needle-nose pliers ($8–$18) – Amazon, hardware stores
- Scissors + precision craft knife ($6–$15) – craft stores
- Felt sheets (for comfort padding) ($4–$10) – Walmart, Michaels
Fresh or Faux Florals
- Faux flower stems ($1–$6 per stem; often on sale) – Michaels/JOANN, Dollar Tree, Amazon
- Fresh flower bundles ($12–$35) – grocery florists, Costco, local flower shops
Budget Planning (Quick Guide)
- Budget DIY crown: $8–$20 (plastic tiara + stickers + a few rhinestones)
- Mid-range crown: $20–$45 (metal base + rhinestones/pearls + quality adhesive)
- Deluxe statement crown: $45–$90 (heavier metal base + layered gems + custom name/“50” + comfort padding)
How to Make a DIY “50” Birthday Crown (Step-by-Step)
This method works with most themes—gold, rose gold, black-and-gold, disco, or elegant neutrals.
What You’ll Need
- Metal crown blank or sturdy tiara base
- “50” number sticker or glitter foam numbers
- Rhinestone strips or gem clusters
- Hot glue gun (or E6000 for metal bonding)
- Felt (small strip for interior comfort)
- Optional: name decal, mini flowers, metallic ribbon streamers
Steps
- Plan your layout: Place the “50” in the center and dry-fit gems around it before gluing.
- Attach the centerpiece: Use E6000 for metal pieces (strongest hold) or hot glue for lighter foam/stickers.
- Add rhinestones in layers: Start with larger gems near the center, then fill gaps with strips or small stones for a “finished” look.
- Balance the weight: Keep heavier embellishments centered so the crown doesn’t tilt.
- Comfort-proof it: Glue a thin felt strip to spots that touch the forehead or temples.
- Let it cure: Hot glue sets quickly; E6000 needs several hours (ideally overnight) before wearing.
Quantity Guidelines: How Many Crowns Should You Make?
It depends on your party style. Here are practical, low-stress guidelines:
- Always: 1 premium crown for the birthday person
- Optional “court”: 2–6 mini crowns for best friends/siblings/kids
- Photo booth fun: 6–12 assorted crowns/headbands for guests to share
- Full guest favors: 1 per guest (best for smaller groups of 8–20 or milestone brunches)
Pro tip: If you’re making crowns for a crowd, do a “mix and match” bar: 12 bases + sticker packs + gems + glue dots so guests can customize their own.
Setup Tips: How to Style Crowns Into Your 50th Birthday Decorations
Crowns aren’t just wearable—they’re a decoration moment. Use them to create a cohesive party look that feels intentional (and looks amazing in photos).
1) Create a “Crowning Station” Welcome Table
- Set the crown on a small cake stand or decorative riser
- Add a sign: “Crown the Birthday VIP” or “Cheers to 50!”
- Scatter metallic confetti and place a framed photo of the guest of honor
- Keep a mini emergency kit: bobby pins, fashion tape, a spare glue dot sheet
2) Pair Crowns With Photo Booth Props
- Use a backdrop in black-and-gold fringe, shimmer wall panels, or balloon garland
- Add crown-themed props: “50 & Fabulous,” “Birthday Royalty,” “Cheers” signs
- Place crowns on hooks or a tiered stand to keep them tidy and visible
3) Match Crown Details to Table Décor
- Gold crown + black plates: Classic 50th birthday party supplies combo
- Rose gold crown + blush napkins: Soft and trendy
- Disco crown + silver chargers: High-energy, dance-floor vibe
4) Use Mini Crowns as Centerpieces
Place a mini crown around a floral vase, on top of a champagne bottle (unopened), or around a candle hurricane. It’s a fun way to echo the theme without overdoing it.
Common Mistakes to Avoid When Making DIY Crowns
- Choosing a flimsy base: If it bends easily, it will warp after embellishing. Spend a little more on a sturdy crown blank for the guest of honor.
- Overloading one side with heavy gems: Crowns tip in photos and feel annoying to wear. Keep weight centered.
- Relying only on cheap glue for metal: Hot glue can pop off smooth metal. Use E6000 (with cure time) for long-lasting hold.
- Skipping comfort padding: A gorgeous crown that pinches will end up on a table. Add felt and test wear for 5 minutes.
- Waiting until party day: Build at least 2–3 days early so adhesives cure and you have time for repairs.
- Ignoring hairstyle planning: Crowns sit differently on sleek hair vs. curls vs. updos. Have bobby pins available and test with the intended hair look.
DIY Alternatives (When Time Is Tight)
If you love the crown idea but don’t want a full craft session, these shortcuts still deliver a polished result:
- Buy a ready-made “50” tiara and customize: Add name decals, extra rhinestones, or ribbon streamers (adds 10 minutes, looks custom).
- Use adhesive gem strips only: Wrap a plain headband with gem strips and add a “50” sticker in the center.
- Printable crown template: Print a crown on metallic cardstock, cut, and reinforce with a second layer. Great for guest crowns or kids at the party.
FAQ: DIY Crowns for 50th Birthdays
What’s the best crown style for a classy 50th birthday dinner?
A minimalist gold leaf crown or a rhinestone tiara with a simple “50” centerpiece looks elegant and photographs beautifully without feeling costume-y. Pair it with matching gold party decorations and warm candlelight.
How do I make sure the crown stays on all night?
Start with a sturdy base, keep the weight centered, and use bobby pins. For headbands, add a small strip of felt or non-slip grip tape underneath to reduce sliding.
How far in advance can I make a DIY crown?
For rhinestone/metal crowns, 3–7 days ahead is ideal. If you’re using E6000 or strong craft adhesive, overnight curing time is your best friend.
Can I make crowns for guests without spending a lot?
Yes—buy bulk plastic tiaras or headbands and decorate with metallic number stickers and a few rhinestone strips. Plan on $2–$5 per guest crown when you keep embellishments simple.
Are fresh flower crowns safe for a long party?
They can wilt, especially outdoors or under warm lights. For long events, faux florals are more reliable. If you love fresh flowers, store the crown in a cool place until party time and mist lightly.
What colors look best for a 50th birthday crown theme?
Timeless favorites: gold, black-and-gold, and champagne. Trend-forward picks: rose gold, disco silver, and white + metallic accents for a modern, clean look.
Next Steps: Plan Your Crown, Then Build the Party Around It
Pick your crown style first (glam rhinestones, chic gold leaf, floral, or disco), then match your party supplies—balloons, tableware, banners, and photo booth décor—to the same color story. Aim for one standout crown for the guest of honor, plus a handful of simpler crowns for photos or the birthday “court.”
- This week: Choose theme colors + order crown bases, gems, and adhesives
- 3–5 days before: Assemble the crown(s) and test for comfort
- Party day: Set up a crowning station, photo backdrop, and backup bobby pins
Want more 50th birthday party ideas, decorations, and smart supply checklists? Explore more inspiration and party planning essentials on smartpartyprep.com.
More Articles
 Unique Candles Ideas for Corporate Events
How to Train Your Dragon Party City: The Exact Checklist for Finding *All* Official Decorations, Costumes & Cake Toppers (No More Wasting Time in Aisle 7)
Where to Find Bachelorette Party Supplies: 7 Real-World Sources (Including 3 That Ship Same-Day & 2 You’ve Probably Overlooked)
When Will Party City Close All Stores? The Truth About Its Future — What You Need to Know Right Now (And Where to Shop Instead)
Unique Candles Ideas for Corporate Events
How to Train Your Dragon Party City: The Exact Checklist for Finding *All* Official Decorations, Costumes & Cake Toppers (No More Wasting Time in Aisle 7)
Where to Find Bachelorette Party Supplies: 7 Real-World Sources (Including 3 That Ship Same-Day & 2 You’ve Probably Overlooked)
When Will Party City Close All Stores? The Truth About Its Future — What You Need to Know Right Now (And Where to Shop Instead)
 What to Take for Christmas Party: The Stress-Free 2024 Checklist (No Last-Minute Panic, No Awkward Empty-Handed Arrival)