Wellness Retreat Seating Arrangement Ideas
A wellness retreat succeeds when guests feel safe, supported, and genuinely able to relax. Seating is one of the most overlooked parts of wellness event planning, yet it shapes everything: the energy in the room, how easily participants connect, how clearly they can see and hear, and whether the retreat feels inclusive and intentional.
Unlike many social events where seating is primarily about maximizing capacity, a retreat seating arrangement is about guiding experience. The right setup can encourage mindfulness, reduce social anxiety, support different mobility needs, and help facilitators manage transitions smoothly from yoga and breathwork to workshops and shared meals.
This guide shares practical, real-world seating arrangement ideas for wellness retreats—plus a step-by-step planning timeline, budget considerations, vendor selection tips, and common mistakes to avoid. Use it as a blueprint for coordinated, professional event planning that still feels warm and human.
Start With the Retreat Goals (Before Picking Any Layout)
Before you choose chairs, floor cushions, or table shapes, define the outcomes of each session. Retreat seating should serve the programming—not the other way around. Add these questions to your event planning checklist:
- Connection: Do you want guests to bond quickly (circle seating) or focus quietly (classroom/rows)?
- Energy: Is the session high-energy (movement-based) or low-energy (restorative, journaling)?
- Facilitation style: Is it lecture-led, discussion-based, or partner work?
- Accessibility: Do you need chair options for those who can’t sit on the floor? Is there aisle space for mobility devices?
- Room limits: What are the venue’s fire code, noise restrictions, and furniture rules?
- Brand experience: Is the retreat luxury spa-like, rustic nature-based, or corporate wellness?
Quick Rule of Thumb: Comfort Beats Capacity
A wellness retreat feels premium when seating looks unhurried. Plan for “breathing room”:
- Floor cushion spots: aim for 4–6 sq ft per person (more for yin/restorative).
- Chair seating: leave 18–24 inches between chair edges when possible.
- Workshop tables: allow 24 inches per seated guest at the table edge.
Seating Arrangement Ideas by Retreat Moment
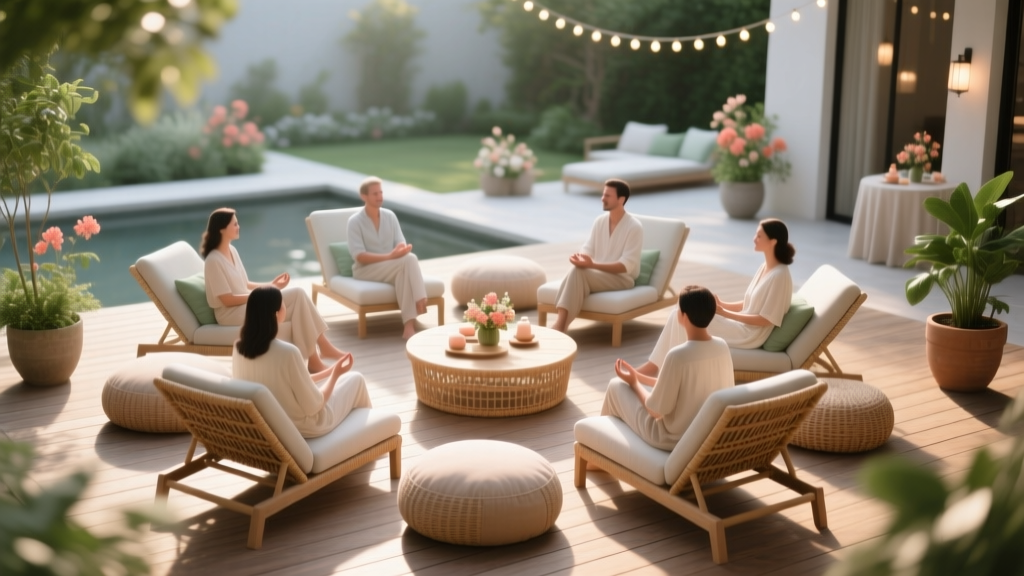
1) Opening Circle (Connection + Psychological Safety)
The opening circle sets the tone. Circle seating is a current event planning trend in wellness because it signals equality—everyone is seen and heard.
Best for: introductions, intention-setting, group agreements, sound bath briefings.
- Full circle on cushions: Use zafus, bolsters, or folded blankets; keep a few chairs in the circle for comfort options.
- Chair circle: Ideal for corporate wellness or mixed-mobility groups.
- Double circle: Inner circle seated, outer circle on cushions—helps accommodate larger groups while preserving intimacy.
Pro coordination tip: Place a small centerpiece in the center (tea light LEDs, flowers, or a “shared intention” card). It visually anchors the group without becoming a distraction.
2) Workshop / Learning Session (Clarity + Note-Taking)
Workshops need sightlines, surfaces, and minimal shuffling. Keep this portion of your party organization plan streamlined.
- U-shape tables: Great for facilitator-led discussions; everyone has a surface and clear view.
- Crescent rounds: Like banquet rounds but “open” toward the speaker; guests can collaborate without turning constantly.
- Classroom style: Best when the retreat includes certification, slides, or detailed note-taking.
- Pods of 4–6: Ideal for interactive sessions; reduces the pressure of speaking in a large group.
Real-world example: A 28-person mindfulness retreat used pods of 5 for a habit-design workshop. Each pod had a tabletop “tool kit” (pens, sticky notes, a timer). The facilitator reported better engagement and fewer interruptions because guests didn’t need to request supplies.
3) Meals (Community Without Overwhelm)
Meal seating can either deepen connection or create social stress. The best wellness retreat seating balances structure and choice.
- Long communal tables: Warm, family-style; works well for rustic or nature retreats.
- Mix of 2-tops and 6-tops: Gives introverts space while still offering group seating.
- Assigned “first meal” seating only: Provide a gentle nudge for mingling at the first dinner, then open seating afterward.
- Quiet table: Label one table as “quiet conversation / mindful meal” for guests who want lower stimulation.
Practical tip: Use subtle table identifiers (herbs like rosemary, lavender, mint) instead of numbers. It feels more on-brand and makes directing guests easier: “You’re at the Lavender table.”
4) Yoga, Breathwork, and Movement Sessions (Flow + Safety)
Movement requires predictable spacing and clear entry/exit paths. Think like a logistics coordinator: how will people enter, place items, and transition?
- Staggered mat grid: Mats aligned with consistent spacing; great for teaching alignment and maintaining calm order.
- Chevron pattern: Slight diagonal rows improve sightlines to the instructor for crowded rooms.
- Semi-circle facing the teacher: Works when you’re demo-heavy and want easy visibility.
- Wall support zone: Reserve a wall side for balance work, modifications, and chair yoga.
Safety standard: Whenever possible, allow 2–3 feet around each mat. If you must tighten spacing, reduce props and create wider aisles to prevent tripping.
5) Meditation / Sound Bath (Stillness + Personal Space)
This is where comfort details matter most. Guests won’t remember the chair brand; they’ll remember whether their hips and neck felt supported.
- “Nest” seating stations: Each spot includes a bolster, blanket, and eye pillow; set them before guests enter.
- Alternating head-to-toe layout: If lying down in close quarters, alternate directions for more personal space feel.
- Perimeter seating for late arrivals: Avoid disrupting the center; late guests can quietly settle along the edges.
Trend to consider: Many retreats now offer a “comfort menu” at the door—guests can pick a chair, cushion, or extra blanket without asking.
6) Breakout Conversations and Coaching (Privacy + Trust)
If your retreat includes coaching, small-group processing, or sensitive discussion, seating needs to create safety and reduce overhearing.
- Triads in corners: Groups of three spaced around the room; use rugs or plants as soft dividers.
- Two-chair coaching pairs: Set pairs at a slight angle (not directly face-to-face) to feel less intense.
- Outdoor circles: Weather permitting, move conversations outside—nature improves perceived privacy.
How to Assign Seats (Without Killing the Retreat Vibe)
Wellness guests often dislike rigid rules, but some structure reduces anxiety. Use a “guided choice” approach:
- Color-coded zones: “Blue zone: quiet; Green zone: conversational.” Guests self-select.
- Interest-based seating: Signs such as “sleep,” “stress,” “nutrition,” “movement,” so guests sit near similar goals.
- Rotation cards: For workshops, place a small card on seats that indicates the breakout group (A/B/C). Guests keep their preferred seat while groups rotate.
Coordination tip: If you assign seats for any portion, explain why: “We’re mixing groups for connection and support.” Guests respond better when the purpose is transparent.
Step-by-Step Planning Timeline + Checklist
6–8 Weeks Out: Design + Data
- Confirm total headcount range (min/target/max) and session list
- Create a seating plan per session (opening circle, workshops, meals, yoga)
- Request venue floor plans with measurements and existing furniture inventory
- Ask facilitators for their preferred layouts and any accessibility needs
- Draft an equipment list (chairs, cushions, tables, clipboards, blankets)
4–5 Weeks Out: Vendors + Logistics
- Get rental quotes for chairs, cushions, tables, and lounge furniture
- Confirm load-in/load-out times and elevator access (if applicable)
- Decide on signage style (minimal, calming fonts; high contrast for readability)
- Plan storage areas for personal items (shoe racks, cubbies, coat area)
- Create a “flip plan” for room transitions (who moves what, when)
2–3 Weeks Out: Finalize + Communicate
- Lock the seating capacity per room and confirm aisle widths
- Print layout diagrams for your day-of binder (or share digitally with staff)
- Confirm ADA-accessible seating locations and communicate options to guests
- Prepare reserved seating for speakers, mobility needs, or staff roles
- Order or gather comfort items (blankets, eye pillows, water carafes)
Week Of: Build + Test
- Do a walkthrough and tape key layout points (center of circle, front row line)
- Test sound and sightlines from back seats
- Run a “quiet entry” rehearsal for meditation/sound sessions
- Prepare a backup plan for weather (outdoor seating alternative)
Day-Of Checklist: Seating Execution
- Place signage at entrances: session type, seating options, where to store shoes/bags
- Stage extra chairs/cushions discreetly at the perimeter
- Keep walkways clear; remove visual clutter (extra boxes, stacked furniture)
- Assign one staff member to manage room flips and reset timing
- Sanitize high-touch seating areas as needed (especially for multi-day retreats)
Budget Considerations (Sample Breakdown)
Your budget will vary by location and guest count, but seating-related costs typically fall into these categories. For a 25–40 person retreat, a practical starting estimate:
- Furniture rentals (chairs/tables/lounge): 20–35%
- Soft goods (cushions/blankets/bolsters): 15–30%
- Labor (setup/flip/reset crew): 15–25%
- Signage + printing: 3–8%
- Decor (minimal, calming): 5–15%
- Contingency (last-minute headcount changes): 5–10%
Cost-saving strategies that still feel premium:
- Mix rental chairs with venue chairs; reserve rentals for front rows or circle sessions
- Buy neutral blankets in bulk (often cheaper than renting) and reuse for future events
- Use clipboards instead of tables for short workshops
- Reduce decor and invest in comfort (guests notice comfort more than centerpieces)
Vendor Selection Tips (Rentals, Venues, and Setup Support)
Strong vendor partners simplify event coordination and reduce day-of stress. When selecting vendors for seating and room setup, ask:
- Inventory consistency: Are chairs the same height/style, or will there be mismatched pieces?
- Comfort specs: Seat height, padding, and back support (especially for long sessions)
- Delivery windows: Can they deliver early enough for a calm setup?
- Labor options: Do they provide setup/strike crew, or is it DIY?
- Damage/cleaning policies: Particularly important for outdoor seating or candle-free requirements
Pro tip: Request photos of the exact chair model in a real event setting. Catalog images rarely show scale, color warmth, or how chairs look under natural light.
Common Seating Planning Mistakes to Avoid
- Overpacking the room: Tight seating raises stress and reduces perceived quality.
- Only offering floor seating: Always include chairs for accessibility and comfort preferences.
- Ignoring transitions: A great layout fails if flips take too long or feel chaotic.
- Poor sightlines: If guests can’t see the instructor, they disengage (or strain their necks).
- No “landing zone” for belongings: Shoes, bags, and water bottles will clutter aisles fast.
- Forgetting sound considerations: Soft seating absorbs sound; large rooms may need extra speakers.
Sample Layout Plan: One-Day Mini Wellness Retreat (30 Guests)
- Arrival + tea: Lounge clusters of 4 (two chairs + small table + two cushions), plus a standing bar for quick greetings
- Opening circle: 20 cushions + 10 chairs in a single circle
- Workshop: Crescent rounds (5 tables of 6) facing the presenter
- Lunch: Two long farm tables of 12 + one round of 6 + one quiet 2-top
- Afternoon yoga: Chevron mat pattern with wide center aisle
- Sound bath: Pre-set “nests” with alternating head-to-toe spacing
FAQ: Wellness Retreat Seating Arrangements
How do I plan seating for guests with different mobility needs?
Offer a mix of chairs and floor options in every session, not just one. Keep accessible seats integrated (not isolated), ensure wide aisles, and confirm restroom routes are clear. If you collect guest preferences during registration, include a question about seating and mobility accommodations.
Should I assign seats at a wellness retreat?
Usually, partial assignment works best. Assign seating for the first meal or first workshop to reduce social anxiety, then switch to open seating with gentle guidance (zones, interest-based signs) once guests feel comfortable.
What’s the best seating for group sharing circles?
A single circle is ideal. Use a combination of cushions and chairs so everyone can participate comfortably. Keep the facilitator in the circle rather than standing outside it, which maintains equality and trust.
How much space should I allow between yoga mats?
Aim for 2–3 feet around each mat when possible. If space is tight, prioritize clear aisles and reduce props on the floor to prevent tripping. Always reserve a modification zone near a wall or where chairs are available.
How can I make a simple venue feel more “retreat-like” through seating?
Use soft goods (blankets, cushions), warm neutral colors, and intentional spacing. Create small “moments” like a tea station with a few stools, a journaling corner with two chairs, and minimal signage that matches the retreat’s tone.
Actionable Next Steps
- Map your retreat schedule and assign a seating layout to each segment (circle, workshop, meal, movement, rest)
- Request venue measurements and build a simple floor plan with aisle widths and storage zones
- Choose a comfort-first inventory: a chair option for every session, plus blankets/bolsters as needed
- Build a room flip plan with roles, timing, and a backup layout for weather or headcount changes
- Finalize vendor quotes early so rentals and labor are locked before last-minute price increases
If you want more practical guidance on event planning, party organization, and smooth event coordination—explore more planning resources and templates on smartpartyprep.com.
More Articles
 What to Make for a Dinner Party: 7 Stress-Free, Crowd-Pleasing Menus (With Timelines, Prep Shortcuts & Wine Pairings You’ll Actually Use)
 Who Is Running for Governor of Ohio Republican Party in 2026? The Complete, Up-to-Date Candidate Breakdown — Including Filing Deadlines, Polling Trends, Key Endorsements, and How to Track Their Platforms Without Getting Overwhelmed
 Is Party Animals on Game Pass in 2024? The Truth About Xbox Cloud Gaming Access, Local Co-Op Setup, and Why You Might Skip It (Even If It’s Free)
Who Was at the Boston Tea Party? The Real Participants — Not Just Sons of Liberty, But Dockworkers, Printers, Clerks, and Even a Teenage Apprentice (Plus Who Wasn’t There… And Why That Matters Today)
Where Was Kendall's 30th Birthday Party Held? The Exact Location, Hidden Venue Logistics, and How to Book a Similar Luxury Private Estate (Without $2M Budget)
Don’t Be Tardy for the Party Show: The 7-Minute Pre-Show Checklist That Prevents Last-Minute Chaos (Used by 92% of Stress-Free Event Coordinators)
Is Party Animals on Game Pass in 2024? The Truth About Xbox Cloud Gaming Access, Local Co-Op Setup, and Why You Might Skip It (Even If It’s Free)
Who Was at the Boston Tea Party? The Real Participants — Not Just Sons of Liberty, But Dockworkers, Printers, Clerks, and Even a Teenage Apprentice (Plus Who Wasn’t There… And Why That Matters Today)
Where Was Kendall's 30th Birthday Party Held? The Exact Location, Hidden Venue Logistics, and How to Book a Similar Luxury Private Estate (Without $2M Budget)
Don’t Be Tardy for the Party Show: The 7-Minute Pre-Show Checklist That Prevents Last-Minute Chaos (Used by 92% of Stress-Free Event Coordinators)
 How Much Does a Party Bus Cost to Rent? The Real-World Breakdown (Spoiler: It’s Not Just $299/hr—Here’s What Actually Drives Your Final Price)
What Is Party 4 U About Meaning? We Decoded the Brand’s True Purpose—And Why Most People Misinterpret Its Role in Modern Event Planning (Spoiler: It’s Not Just a Vendor)
What Is an Ideological Party? The Truth Behind the Term — Why Most People Confuse It With Interest Groups, Single-Issue Movements, and Populist Campaigns (and How to Spot the Real Thing in 2024)
How Much Does a Party Bus Cost to Rent? The Real-World Breakdown (Spoiler: It’s Not Just $299/hr—Here’s What Actually Drives Your Final Price)
What Is Party 4 U About Meaning? We Decoded the Brand’s True Purpose—And Why Most People Misinterpret Its Role in Modern Event Planning (Spoiler: It’s Not Just a Vendor)
What Is an Ideological Party? The Truth Behind the Term — Why Most People Confuse It With Interest Groups, Single-Issue Movements, and Populist Campaigns (and How to Spot the Real Thing in 2024)