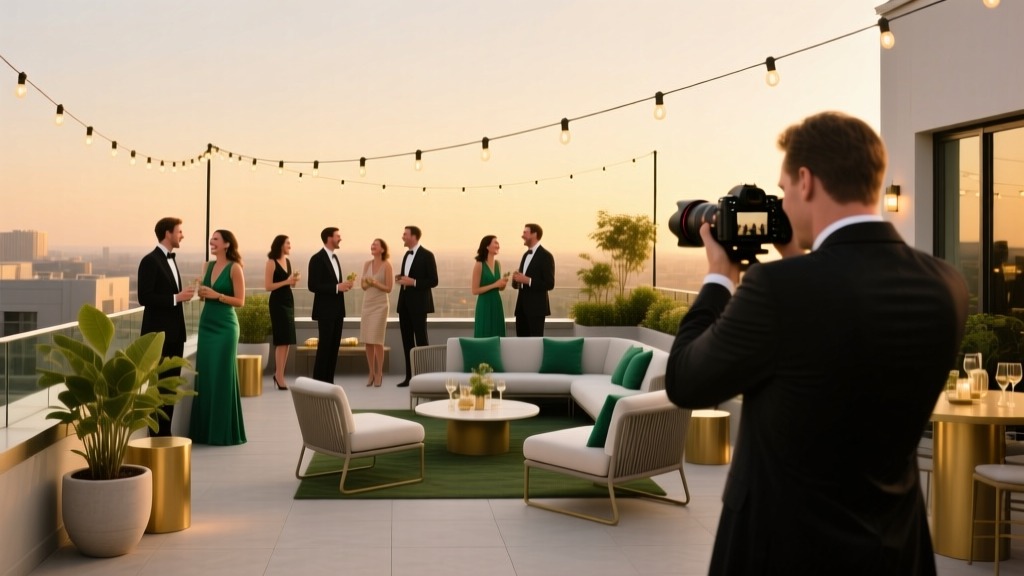
Rooftop Party Photography Tips: Plan, Style, and Capture Stunning Event Photos
Rooftop parties have a built-in “wow” factor—skyline views, golden-hour light, and an elevated atmosphere that feels instantly special. But those same elements can also make photography tricky: harsh sun, strong wind, unpredictable weather, mixed lighting after sunset, and reflective city surfaces can quickly turn beautiful moments into unusable photos.
Great rooftop party photos don’t happen by accident. They’re the result of smart event planning, thoughtful layout decisions, and vendor coordination that prioritizes light, flow, and guest experience. When you plan with photography in mind, you’ll capture the details you paid for—decor, food, branding, and genuine guest moments—without turning the party into a photo shoot.
This guide walks you through rooftop party photography tips from an event planning perspective: how to schedule the day, set the scene, choose vendors, and avoid the common mistakes that cause missed shots. Use it as a step-by-step playbook whether you’re planning a birthday, engagement, corporate mixer, or rooftop celebration.
Start With Photo Goals: What Needs to Be Captured?
Before you choose a photographer or build a timeline, define your “must-have” shots. This helps you plan the schedule, layout, and lighting in a way that supports your priorities.
Common rooftop party photo priorities
- Hero skyline shots: Wide images that show the view, venue, and crowd.
- Key moments: Toasts, speeches, cake cutting, proposal, award presentation, grand entrance.
- Group photos: Family/friend groupings or team photos for corporate events.
- Detail shots: Tablescapes, signage, florals, branded elements, cocktails, catering displays.
- Candid guest coverage: Natural interactions, laughter, dancing, mingling.
- Social media content: Vertical-friendly moments, short-form video clips, “IG-worthy” backdrop shots.
Create a simple “shot list” planning document
Keep it short and useful. Aim for one page that includes:
- Event start/end time and address
- Two to three “non-negotiable” moments with exact timing
- VIP list (names and relationships)
- Any sensitive requests (no photos of specific guests, kid privacy preferences)
- Brand guidelines (for corporate events): logo placement shots, sponsor signage, product moments
Rooftop Lighting Strategy: Plan Around the Sun (and City Glow)
Lighting is the biggest factor in rooftop party photography. Your event planning timeline should intentionally use daylight, golden hour, and nighttime city lights.
Best times for rooftop photos
- Golden hour: Typically the hour before sunset—soft, flattering light and dramatic skies.
- Blue hour: The 15–30 minutes after sunset—city lights start to sparkle while the sky still holds color.
- Nighttime: Requires intentional lighting (string lights, uplights, LED panels, flash strategy).
Practical lighting tips for planners
- Schedule “photo moments” near golden hour: Toasts, couples’ portraits, or a group shot look best then.
- Use shade intentionally: If your rooftop has umbrellas or a pergola, position mingling areas to reduce harsh midday shadows.
- Avoid backlit faces: Place the main action so the sun isn’t directly behind guests’ heads (unless you want silhouette style).
- Plan for mixed lighting at night: City lights + string lights + DJ lights can create odd color casts; coordinate lighting temperatures (warm vs cool) when possible.
Layout and Decor That Photograph Well (Without Blocking the View)
Rooftops often have narrow walkways, safety rails, and fixed structures. Your event layout should protect guest flow and give photographers clear angles.
Photography-friendly layout principles
- Keep the skyline “clean”: Avoid placing tall banners, tent poles, or bulky equipment where they block the best view lines.
- Create a dedicated photo moment area: A simple backdrop or styled corner prevents guests from crowding railings for photos.
- Leave 3–5 feet of clearance: Around the bar, buffet, and key décor so photographers can move.
- Separate “action zones”: Place DJ/dance area away from dining to reduce clutter in wide shots.
Decor trends that look great in rooftop photos
- Statement lighting: Bistro/string lights, Edison bulb strands, LED “neon” signs with custom phrases.
- Monochrome or tonal palettes: Modern and clean in photos, especially for corporate events.
- Small floral clusters + candles: Lower profiles that don’t block faces or skyline views.
- Interactive styling: Champagne wall, signature cocktail station, photo guestbook table.
Vendor Selection Tips: Photographer, Lighting, and Rentals
The best rooftop party photography results come from the right vendor team. Choose professionals experienced with outdoor and high-contrast environments.
How to choose a rooftop-ready photographer
- Ask for a full gallery: Not just highlights—review an entire rooftop or outdoor evening event.
- Confirm low-light capability: They should be comfortable with flash, fast lenses, and noise control.
- Discuss wind and equipment safety: Rooftops can be gusty; photographers should secure light stands and gear.
- Clarify deliverables: Number of edited images, turnaround time, and whether short-form video is included.
Lighting vendor and rental coordination
- Uplighting: Enhances walls/columns and makes photos feel richer after sunset.
- Pin spots: Highlight centerpieces, cake, or brand displays for crisp detail shots.
- LED panels for video: Great for speeches and toasts—clean light without harsh flash.
- Weather-friendly gear: Confirm what’s rated for outdoor use and what happens if rain is forecast.
Step-by-Step Planning Timeline (With Checklist)
Use this timeline template to coordinate rooftop party organization with photography needs. Adjust based on guest count and event complexity.
6–8 weeks before
- Book rooftop venue and confirm rules: sound limits, lighting restrictions, elevator access, load-in times
- Select photographer/videographer and confirm coverage hours
- Request sunset time for your event date and build a draft “golden hour” window into the schedule
- Choose event style: color palette, dress code, décor priorities
- Start a shared planning folder (shot list, vendor contracts, timeline, inspiration images)
4–5 weeks before
- Finalize key moment timing: entrance, toast, cake, presentations
- Book lighting/DJ and confirm whether they provide uplights or dance lighting
- Confirm rental needs: lounge furniture, umbrellas/heaters, high tops, linens
- Plan a photo-friendly layout: bar placement, backdrop area, signage locations
- Send photographer your venue photos and any restrictions (tripods, drones, flash rules)
2–3 weeks before
- Create a “must-have shots” list and assign a helper to gather groups efficiently
- Confirm vendor arrival windows, elevator reservations, and loading instructions
- Review weather backup options: tenting, indoor access, reschedule policies
- Plan signage and branding placement (especially for corporate rooftop events)
1 week before
- Finalize the minute-by-minute timeline and share with all vendors
- Confirm lighting plan and run-of-show for speeches
- Prepare an emergency kit: clips for linens, double-sided tape, hair ties, blotting papers
- Walk through the venue (or do a video call) and identify best photo angles
Day-of checklist (planner-friendly)
- Confirm weather and wind conditions; implement backup plan if needed
- Do a quick “clutter sweep” before guests arrive (boxes, cords, bags)
- Test lighting at dusk (string lights, uplights, DJ lights)
- Reserve 10 minutes during golden hour for VIP/group photos
- Have water available for vendors and a clear point of contact for timing cues
Budget Considerations: Where Photography Spend Matters Most
Rooftop events often cost more due to rentals, staffing, and logistics. If photos are a priority, allocate budget strategically.
Sample photography-focused budget breakdown (adjust to your market)
- Photographer: 10%–20% of total event budget (higher for nighttime-heavy events)
- Lighting (uplights, pin spots, LED panels): 5%–12%
- Backdrop/photo moment area: 2%–6% (can be low-cost with smart styling)
- Content add-on (social media reels/short video): 5%–15% if using a dedicated creator
Smart ways to save without sacrificing photo quality
- Shorten coverage, not quality: Book fewer hours but schedule key moments efficiently.
- Prioritize lighting over extra décor: Great lighting makes simple design look premium in photos.
- Rent fewer items, style them better: One statement lounge area can serve as a photo zone.
- Bundle services: Some vendors offer DJ + uplighting packages or photo + video bundles.
Real-World Examples: What Works on Rooftops
Example 1: 40-guest birthday cocktail party
- Challenge: Guests arrive at 6:30 PM; sunset at 7:45 PM; limited space.
- Solution: Schedule a quick group photo at 7:20 PM, then a toast at 7:35 PM for golden-hour glow.
- Photo win: A small neon sign + two bar-height tables created a consistent “photo spot” without blocking the skyline.
Example 2: Corporate rooftop mixer with branding
- Challenge: Sponsor logos needed in photos; evening event with mixed lighting.
- Solution: Pin spot lighting on the sponsor wall, and place it near the bar for organic traffic.
- Photo win: Photographer captured branded step-and-repeat shots early, then candids later without interrupting flow.
Common Rooftop Party Photography Mistakes to Avoid
- Planning the main toast after dark with no lighting: Speeches need consistent light; add LED panels or uplighting.
- No weather plan: Wind and rain cause delays and chaos; confirm tenting rules and refund/reschedule policies.
- Overcrowding the best view line: If the railing becomes the only “photo spot,” photos look repetitive and traffic jams happen.
- Ignoring sound restrictions: If music must be lowered early, dancing photos may never happen—schedule accordingly.
- Not assigning a “group photo wrangler”: Photographers can’t magically gather VIPs; designate a confident helper.
- Too many competing light colors: DJ lasers + purple uplights + warm string lights can make skin tones unpredictable.
Pro Coordination Tips for Smooth Photo Moments
Use a run-of-show with clear cues
A simple event planning timeline prevents missed shots. Include:
- Exact timing for the toast, cake, speeches, announcements
- Where each moment happens (bar area, center lounge, backdrop wall)
- Who signals the transition (planner, DJ/MC, host)
Keep photo moments fast and friendly
- Announce group photos early: “We’ll do a quick group shot in 10 minutes by the sign.”
- Limit formal groupings to 10 minutes total for social events.
- For corporate events, do team photos during arrival while people look fresh.
FAQ: Rooftop Party Photography Tips
How do I plan a rooftop party timeline around sunset?
Look up sunset time for your date and location, then schedule your most meaningful photos 45–15 minutes before sunset (golden hour) and one quick set 10–20 minutes after sunset (blue hour). Place speeches/toasts during a well-lit window or add LED lighting if they must happen later.
Do I need extra lighting for a rooftop party?
If your event continues after sunset, yes. String lights help ambiance but rarely provide enough light for clean faces. Uplighting and a small LED panel setup for speeches can make a dramatic difference in photo quality.
What should I tell my photographer before the event?
Share the venue address, access details, a short shot list, VIP names, your timeline, and any restrictions (flash rules, drone policies, load-in limitations). Also mention wind concerns and where you plan to place key décor.
How can I make a rooftop party look good in photos on a budget?
Focus on one statement photo area (sign + simple backdrop), consistent lighting, and a clean layout. Reduce clutter, limit tall centerpieces, and use candles or small florals to elevate tables without blocking faces.
What’s the best layout for rooftop party photos?
Design zones: a dedicated photo moment area, a clear bar line, a mingling lounge zone, and an open space for speeches or dancing. Keep walkways open so photographers can move and avoid placing tall items where they block skyline shots.
Next Steps: Your Rooftop Photo-Ready Action Plan
- Choose your top three photo priorities (moments, people, and details).
- Build your rooftop party timeline around golden hour and identify one backup option for weather.
- Select a rooftop-experienced photographer and confirm lighting needs for after-dark coverage.
- Create a simple layout with a dedicated photo moment area and clear traffic flow.
- Share a one-page run-of-show and shot list with vendors one week before the event.
If you’re planning a rooftop celebration and want the photos to match the experience, a little coordination goes a long way. Explore more event planning checklists, vendor tips, and party organization guides at smartpartyprep.com.
More Articles
 When Did the Populist Party End? The Surprising Truth Behind Its Official Dissolution—and Why Most Historians Get the Timeline Wrong
 The 12 Non-Negotiable Must Haves for Graduation Party (That 83% of Hosts Forget Until the Day Before — and Regret)
How to Use First Party Data the Right Way in 2024: 7 Actionable Steps That Boost Event Conversion by 3.2x (Without Third-Party Cookies or Guesswork)
How to Choose Your Wedding Party Without Guilt, Resentment, or Last-Minute Panic: A Step-by-Step Framework That Prioritizes Your Marriage Over Tradition
How to Sell a Car Private Party Without Getting Scammed, Stuck, or Underpaid: The 7-Step Stress-Free Blueprint That Saves $2,100+ (On Average) vs. Dealership Trade-Ins
How Do You Throw a Space Party That Actually Feels Like Orbiting Saturn? (7 Realistic, Budget-Savvy Steps Even Beginners Nail)
The 12 Non-Negotiable Must Haves for Graduation Party (That 83% of Hosts Forget Until the Day Before — and Regret)
How to Use First Party Data the Right Way in 2024: 7 Actionable Steps That Boost Event Conversion by 3.2x (Without Third-Party Cookies or Guesswork)
How to Choose Your Wedding Party Without Guilt, Resentment, or Last-Minute Panic: A Step-by-Step Framework That Prioritizes Your Marriage Over Tradition
How to Sell a Car Private Party Without Getting Scammed, Stuck, or Underpaid: The 7-Step Stress-Free Blueprint That Saves $2,100+ (On Average) vs. Dealership Trade-Ins
How Do You Throw a Space Party That Actually Feels Like Orbiting Saturn? (7 Realistic, Budget-Savvy Steps Even Beginners Nail)
 What Political Party Does Coca-Cola Support? The Truth Behind Corporate Donations, PACs, and Why 'Support' Is a Misleading Term — Not What You’ve Heard
Which political party aligns most closely with the tea party? The truth behind its legacy, why neither major party fully claims it today, and how grassroots conservatism reshaped GOP identity after 2009 — not what you’ve heard on cable news.
What Political Party Does Coca-Cola Support? The Truth Behind Corporate Donations, PACs, and Why 'Support' Is a Misleading Term — Not What You’ve Heard
Which political party aligns most closely with the tea party? The truth behind its legacy, why neither major party fully claims it today, and how grassroots conservatism reshaped GOP identity after 2009 — not what you’ve heard on cable news.
 What to Wear to a House Party: The 7-Second Dress Code Decoder (No More Awkward Outfit Regrets, Ever)
How Did the Boston Tea Party Influence the American Revolution? The 5 Unspoken Catalysts That Transformed Protest Into War — And Why Most Textbooks Get It Wrong
What to Wear to a House Party: The 7-Second Dress Code Decoder (No More Awkward Outfit Regrets, Ever)
How Did the Boston Tea Party Influence the American Revolution? The 5 Unspoken Catalysts That Transformed Protest Into War — And Why Most Textbooks Get It Wrong