Pop-Up Shop Photography Tips: Plan, Shoot, and Share Images That Drive Foot Traffic and Sales
Pop-up shops move fast: limited-time offers, short setup windows, and high expectations for a “wow” factor that attracts shoppers on the spot. Photography is often the difference between a pop-up that feels busy and a pop-up that actually becomes busy. The right images help you market the event before doors open, guide customers once they arrive, and keep sales momentum going after you pack up.
Great pop-up photography doesn’t happen by accident. It’s the result of event planning, coordination with vendors, and a clear shot list tailored to your brand and audience. When you plan the visuals alongside layout, signage, lighting, and timelines, you reduce stress on event day and walk away with a complete set of photos you can reuse for promotions, press outreach, product listings, and future pop-up shop planning.
This guide breaks down pop-up shop photography tips into practical steps, including planning checklists, budget considerations, vendor selection strategies, and common mistakes to avoid—so your event looks as good online as it feels in person.
Start With a Photo Plan: What Success Looks Like for Your Pop-Up
Define your goals (sales, brand awareness, content library)
Before you choose a photographer or set up a “photo corner,” decide what you need the photos to do:
- Drive attendance: social posts, ads, event listing images, PR outreach.
- Drive sales: product photos in-context, bundles, and “best seller” callouts.
- Build credibility: crowd shots, customer interactions, testimonials, influencer moments.
- Create reusable assets: images for your website, email marketing, lookbooks, and future pop-up promotions.
Build a simple pop-up shop shot list
A shot list is a proven organizational strategy for smooth event coordination. Use it to keep your team aligned and reduce missed moments. Aim for:
- Hero exterior: storefront, signage, line (if any), branded entrance moment.
- Wide interior: full layout, sections, pathways, checkout area.
- Product stories: best-sellers, new arrivals, limited drops, bundles, price points.
- Details: packaging, labels, textures, table styling, props, florals, branded touches.
- Human moments: staff helping customers, demos, try-ons, workshops, reactions.
- Conversion moments: at checkout, gift wrapping, QR code scans, loyalty sign-ups.
- Partner/vendor moments: sponsor signage, collaborations, featured makers.
Match your images to current event planning trends
Pop-ups today are more than sales floors—they’re experiences. Photography should capture these trends naturally:
- Immersive micro-moments: interactive stations, customization bars, “build-your-own” experiences.
- UGC-friendly layouts: selfie walls, branded mirrors, aesthetic vignettes.
- Community: local vendor collabs, charitable tie-ins, workshops, and networking angles.
- Sustainability: refill stations, recyclable packaging, “low-waste” signage—document it.
Lighting and Layout: The Two Biggest Drivers of Great Photos
Use lighting like an event design tool
If your venue lighting is harsh, mixed-color, or too dim, photos suffer—especially on phones. Plan your lighting like you plan your timeline.
- Prioritize consistent color temperature: avoid mixing warm tungsten bulbs with cool LEDs where possible.
- Add soft fill light: small LED panels or continuous lights near hero displays and checkout.
- Test at event time: daylight changes affect storefront and window display photos.
- Use practical lighting: table lamps, string lights, or neon signs can be functional and photogenic.
Design a “photo path” through the pop-up
In event planning, flow controls experience. In photography, flow controls background clutter and storytelling.
- Keep hero areas clean: one feature wall or display should be free of boxes, bags, and personal items.
- Create depth: layer a foreground product, mid-ground interaction, and background branding.
- Control clutter zones: hide storage behind curtains, pipe-and-drape, or branded screens.
- Place signage where it photographs well: at eye level, facing traffic, near natural light.
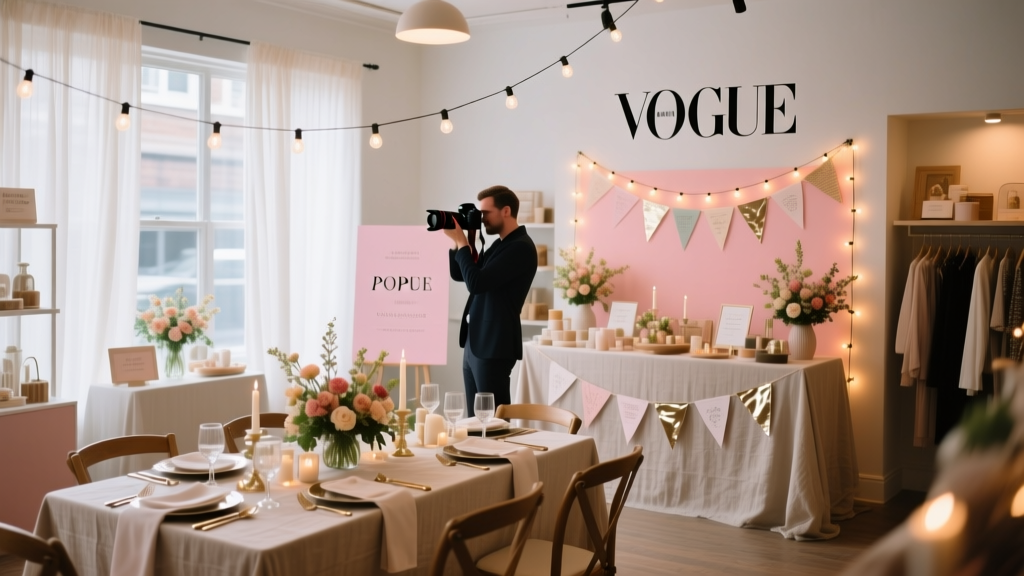
Real-world example: the “three-zone” layout
For a weekend skincare pop-up in a shared retail space, a simple three-zone plan creates content variety:
- Zone 1 (Entrance): bold logo wall + best-seller table for quick hero shots.
- Zone 2 (Experience): mini “skin consult” bar with ring light for consistent portraits.
- Zone 3 (Checkout): gift wrap + thank-you signage + QR code for loyalty sign-ups (capture conversions).
Step-by-Step Planning Timeline (With Checklist Items)
4–6 weeks out: strategy and vendor coordination
- Define photography goals and deliverables (social, website, press, ads).
- Create a shot list and a “must-capture” moment list (e.g., ribbon cutting, influencer visit).
- Set brand guidelines: color palette, preferred angles, what not to photograph (customer privacy).
- Decide on coverage: 2-hour content sprint vs. full-day documentation.
- Source vendors: photographer, lighting rental, backdrop/signage printer.
- Confirm venue rules: tripod use, flash permissions, release signage requirements.
2–3 weeks out: marketing and staging plan
- Finalize floor plan with “hero photo zones” marked.
- Plan product groupings and styling props (risers, trays, textiles, florals).
- Order branded assets: step-and-repeat, logo decals, photo-op signage, QR codes.
- Write a short photo brief for your team and vendors (who, what, when, where).
- Schedule any special moments at specific times (demo, mini workshop, VIP hour).
1 week out: confirmation and rehearsal
- Confirm call times, parking/load-in instructions, and contact list.
- Do a lighting test plan: identify outlets, extension cords, and backup bulbs.
- Prepare a “photo kit” (see checklist below).
- Print simple signage: “Photos in progress—please ask if you prefer not to be included.”
- Create a run-of-show with 15-minute blocks for key shots.
Event day: execute in phases
- Before doors open (30–60 minutes): clean wide shots, product close-ups, staff portraits, signage.
- Opening rush (30–90 minutes): crowd energy, candid interactions, line/exterior.
- Midday reset (10 minutes): quick tidy, restock hero tables, remove trash/boxes.
- Experience moments: demos, workshops, customization—capture hands at work.
- Closing: “last chance” energy, final wide shot, team photo, sponsor/vendor shout-outs.
Pop-Up Shop Photography Checklist (Print-Friendly)
- Brand assets: logo signs, price cards, QR codes, business cards, packaging.
- Staging tools: risers, trays, clips/tape, lint roller, microfiber cloth.
- Lighting: LED panel/ring light, spare batteries, extension cords, gaffer tape.
- Tech: phone chargers, power bank, spare memory cards (if using camera).
- Team: one person assigned as “photo wrangler” for resets and approvals.
- Customer privacy: release signage and a plan to avoid photographing minors.
Budget Considerations: What to Spend and Why
Photography budget ranges (typical scenarios)
Your budget will depend on event duration, deliverables, and location. Use these ranges as planning starting points:
- DIY content sprint: $0–$150 (basic lighting, tripod, phone lens clip).
- Content creator/photographer for 2–3 hours: $300–$900.
- Professional event photographer (half-day): $900–$2,000+.
- Full-day coverage + fast turnaround: $1,800–$3,500+.
Sample budget breakdown (mid-range pop-up)
- Photographer (3 hours + edits): $750
- Backdrop/signage printing: $200
- Lighting rental or purchase: $150
- Styling props/florals: $100
- Contingency (10%): $120
- Total: $1,320
Smart ways to stretch a small budget
- Book shorter coverage: schedule your busiest hour and staged moments within that window.
- Prioritize deliverables: request 20–30 edited hero images + a handful of vertical social crops.
- Use a “content concierge” approach: one team member captures BTS and quick phone video all day.
- Batch styling: create one premium vignette that can be photographed from 10 angles.
Vendor Selection Tips: Hiring the Right Photographer (or Content Creator)
Questions to ask before you book
- Have you shot retail events or pop-up shops in tight spaces?
- Can you deliver a mix of wide shots, details, and people?
- What’s your turnaround time? Do you offer same-day selects for social media?
- How do you handle low light or mixed lighting?
- What are your licensing terms for commercial use (ads, website, email marketing)?
What to include in the photography brief
- Event schedule, address, parking/load-in details
- Shot list and “top 10 must-haves”
- Brand references (mood board, past campaigns, preferred edits)
- Key people to photograph (founder, collaborators, VIPs)
- Any restrictions (no flash, customer privacy guidelines)
On-Site Pop-Up Shop Photography Tips That Work Every Time
Get the “clean set” before customers arrive
Once the crowd comes in, it’s harder to photograph product displays without distractions. Aim to capture:
- One wide shot of every area (entrance, hero table, featured wall, checkout)
- Three close-ups per best-seller (front, angle, in-hand or styled)
- Branded signage clearly readable (logo + location)
Capture proof of popularity (without faking it)
- Photograph the line from an angle that shows depth and signage.
- Focus on moments of interaction: demos, consultations, try-ons.
- Take a burst of 5–10 frames during laughter, reactions, and handoffs.
Plan for vertical content
Current event marketing trends favor vertical photos for social platforms. Ask for (or shoot) vertical compositions of:
- Entrance moment
- Founder talking to customers
- Product styling close-ups
- Checkout and packaging
Common Pop-Up Shop Photography Planning Mistakes to Avoid
- No shot list: leads to missing hero products, sponsor signage, or key moments.
- Clutter creep: boxes, coats, and trash sneak into backgrounds—assign a reset person.
- Mixed lighting chaos: photos look green/orange; bring consistent fill lighting.
- Ignoring permissions: venue rules or customer privacy concerns can derail content plans.
- Only photographing products: people + experience sell the story and drive future attendance.
- No plan for fast sharing: post while energy is high; build time for same-day selects.
FAQ: Pop-Up Shop Photography Tips
How many photos do I need from a pop-up shop?
For most pop-up events, plan for 25–60 edited images: 10 hero shots, 10–20 product/detail shots, and 10–30 lifestyle/crowd images. If you’re running ads or frequent campaigns, request more variety.
Should I hire a photographer or use my phone?
If your pop-up is primarily for brand growth, PR, or major sales goals, a photographer is usually worth it. If budget is tight, use a phone with good lighting and a strict shot list—then focus on 10 great images rather than 100 average ones.
What’s the best time to take photos during the event?
Schedule a pre-open session for clean product and space shots, then a peak hour session for energy and crowd photos. Add a quick midday reset to refresh the space for a second round of images.
How do I handle customer privacy in photos?
Use polite signage, avoid photographing minors, and focus on hands, backs, and interactions unless you have consent. If you plan posed portraits, use simple release forms (paper or QR-based).
What should my team do while the photographer is shooting?
Assign roles: one person restocks and tidies, one person manages customer flow, and one person acts as the photographer’s point of contact to confirm shot priorities and pull products as needed.
Next Steps: Turn Your Pop-Up Into a Repeatable Content System
Use your shot list and timeline as a reusable template for future pop-ups. Within 48 hours after the event, organize photos into folders (Hero, Products, People, Details, Partners), select 5–10 images for immediate posting, and schedule the rest across the next two to four weeks to extend your marketing runway.
- Finalize your shot list and floor plan today.
- Choose your coverage window and book vendors this week.
- Pack your photo kit and run a lighting test before event day.
For more step-by-step event planning, party organization, and coordination guides—plus practical checklists for pop-ups and brand events—explore the latest resources on smartpartyprep.com.
More Articles
 What Is a Function of Political Parties? 7 Essential Roles They Play — And Why Most People Misunderstand Their Real Power in Democracy (Not Just Elections!)
What to Wear on Yacht Party: The 7-Second Outfit Checklist (No More Guesswork, Sunburns, or Slip-Ups on Deck)
Can an attorney represent both parties? The truth about dual representation—and why it’s almost always a dangerous conflict of interest (even when both sides say 'yes')
What Is a Function of Political Parties? 7 Essential Roles They Play — And Why Most People Misunderstand Their Real Power in Democracy (Not Just Elections!)
What to Wear on Yacht Party: The 7-Second Outfit Checklist (No More Guesswork, Sunburns, or Slip-Ups on Deck)
Can an attorney represent both parties? The truth about dual representation—and why it’s almost always a dangerous conflict of interest (even when both sides say 'yes')
 How to Change Party Affiliation NYC: A Step-by-Step Checklist That Takes Just 7 Minutes (No Mail, No Wait, No Mistakes)
What Political Party Does Meijer Stores Support? The Truth Behind Donations, PACs, and Why Their Neutrality Policy Matters More Than You Think — Here’s the Full 2024 Breakdown
How to Change Party Affiliation NYC: A Step-by-Step Checklist That Takes Just 7 Minutes (No Mail, No Wait, No Mistakes)
What Political Party Does Meijer Stores Support? The Truth Behind Donations, PACs, and Why Their Neutrality Policy Matters More Than You Think — Here’s the Full 2024 Breakdown
 What Are the 3 Main Beliefs of the Tea Party? Debunking Myths, Clarifying Core Principles, and Explaining Why They Still Resonate in Today’s Political Climate — Not What You’ve Heard on Cable News
What Is Farewell Party? (And Why Getting It Right Builds Lasting Goodwill — Not Awkwardness) — A Step-by-Step Guide for Hosts, HR Teams & Friends Who Don’t Want to Mess This Up
What Are the 3 Main Beliefs of the Tea Party? Debunking Myths, Clarifying Core Principles, and Explaining Why They Still Resonate in Today’s Political Climate — Not What You’ve Heard on Cable News
What Is Farewell Party? (And Why Getting It Right Builds Lasting Goodwill — Not Awkwardness) — A Step-by-Step Guide for Hosts, HR Teams & Friends Who Don’t Want to Mess This Up
 What Party Was Woodrow Wilson? The Surprising Truth Behind His Political Affiliation — And Why Most People Get It Wrong (Especially When Studying Progressive Era Reforms)
When Does Hunting Party Come Back On? Your 2024–2025 Season Calendar + Exact Dates, Sign-Up Deadlines & How to Secure Your Spot Before Spots Fill Up
What Party Was Woodrow Wilson? The Surprising Truth Behind His Political Affiliation — And Why Most People Get It Wrong (Especially When Studying Progressive Era Reforms)
When Does Hunting Party Come Back On? Your 2024–2025 Season Calendar + Exact Dates, Sign-Up Deadlines & How to Secure Your Spot Before Spots Fill Up