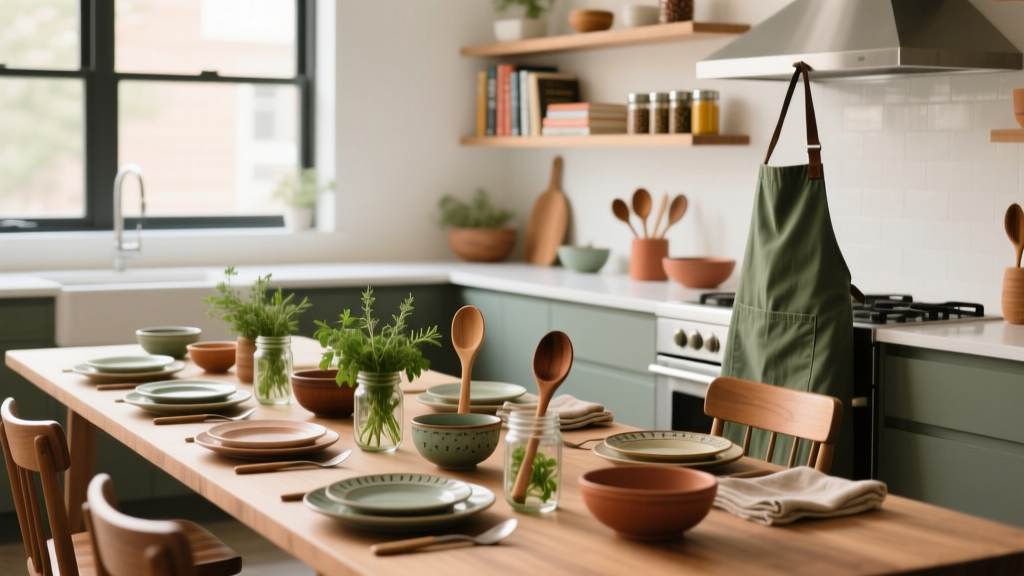
Cooking Class Decor Ideas That Wow
A cooking class event has a unique kind of pressure: guests will be moving, washing hands, sharing tools, and photographing everything they make. The decor can’t just look good—it has to function in a working kitchen environment while keeping the mood elevated and the flow organized. When planning is done well, the space feels like a boutique culinary studio: welcoming, photogenic, and easy to navigate.
Proper event planning also protects your timeline and your budget. Cooking classes involve more moving parts than many parties—food safety considerations, equipment placement, vendor coordination, and a tight schedule that doesn’t allow for decor mishaps. With a clear plan, you can create “wow” moments (the kind guests post instantly) without interfering with prep space, chef demonstrations, or cleanup.
Below you’ll find practical, step-by-step cooking class decor ideas, planning templates, budget guidance, vendor tips, and common pitfalls to avoid—so your event feels polished from the welcome sign to the final plated photo.
Start With a Decor Concept That Supports the Cooking Experience
Before you buy anything, define your event style in one sentence. This keeps every decor decision cohesive and prevents overspending on items that don’t fit.
Pick a theme that naturally pairs with a menu
- Modern Mediterranean: citrus, olive branches, blue-and-white linens, brass accents
- Cozy Pasta Night: warm neutrals, gingham napkins, rustic wood boards, candlelight (LED near work zones)
- Sushi & Sake Studio: minimal black/white palette, clean lines, small ikebana arrangements
- Farm-to-Table: herbs, kraft paper, seasonal produce as decor, recycled glass bottles
- Parisian Patisserie: soft pastels, marble-inspired details, tiered display stands
Use the “3-Point Decor Rule” for event design balance
Build your cooking class decor around three anchor zones:
- Arrival moment: welcome signage + a small styling vignette (photo-friendly)
- Instruction zone: chef/demo station backdrop that reads well in photos
- Dining/finishing zone: tablescape or plating bar where guests show off final dishes
Cooking Class Decor Ideas That Look Great and Work Hard
1) A “Studio-Style” Welcome Area (fast to set up, high impact)
Guests need immediate direction: where to check in, wash hands, and place bags. Make this area both functional and Instagram-ready.
- Welcome sign: foam board, acrylic, or framed poster with class name, menu, and schedule
- Apron display: hang aprons on a garment rack with labeled tags (doubles as decor)
- Hand-care station: chic pump soap, paper towels, small trash bin, and a simple “Wash Hands” sign
- Photo corner: a branded backdrop (fabric panel or step-and-repeat style) with good lighting
Real-world example: For a 16-person “Taco + Margarita” class, use a bright welcome board, a mini balloon garland in citrus tones (away from heat), and a tray of limes/sea salt as the styling vignette.
2) The Demo Station Backdrop (the best “wow” per dollar)
Most photos will be taken during instruction. A simple, clean backdrop elevates the experience and makes your event look professionally produced.
- Backdrop options: linen drape, tension fabric banner, pegboard wall with utensils, or a freestanding shelf styled with cookbooks
- Lighting upgrade: soft LED panel lights or ring light on a stand (current event trend: “content-friendly” lighting)
- Branding detail: small logo sign or custom class name banner (great for corporate team building or birthdays)
Pro tip: Keep the demo background uncluttered. Use 2–3 large elements rather than many small items. It reads better in videos and avoids visual noise.
3) Color-Coded Cooking Stations (organization as decor)
One of the most effective party organization strategies is color coding. It reduces confusion and makes the room look intentionally styled.
- Station markers: colored tent cards (“Station A,” “Station B”) or ingredient lists in matching colors
- Matching tool bins: one bin per station with tongs, spatulas, measuring spoons, and towels
- Uniform towels: identical kitchen towels at each station for a cohesive look
Practical tip: Repeat the same color in three places: station sign, towel, and ingredient tray label. Guests instantly know what belongs where.
4) Centerpieces That Survive Heat, Movement, and Spills
Skip tall florals and fragile arrangements. Aim for low, stable decor that won’t interfere with chopping or conversation.
- Herb pots (mint, basil, rosemary): functional and fragrant
- Produce centerpieces: bowls of lemons, peppers, or apples (ties to the menu)
- Bud vases: 2–3 small vases spread out instead of one big arrangement
- Menu cards: printed recipe cards at each place setting double as decor
5) A “Plating Bar” or Finishing Station
This is where guests feel like chefs. It also controls traffic: instead of everyone grabbing garnishes from random places, you create one dedicated finishing zone.
- Backdrop: small chalkboard sign reading “Finish + Plate”
- Garnish lineup: herbs, citrus zest, flaky salt, chili oil, microgreens
- Clean styling: white trays, labeled jars, and a wipeable mat
Trend watch: Interactive food stations remain popular, but today’s version is more curated—clean labeling, coordinated serving pieces, and intentional lighting for photos.
6) Elevated Table Settings Without the Fuss
Cooking class guests need space. Keep the table setting streamlined and durable.
- Plates: simple white for a “restaurant” look in photos
- Linens: washable napkins (cotton or poly blend) in your accent color
- Place cards: use mini clip stands (they won’t blow away or smear)
- Water carafes: one per table reduces clutter and improves flow
Step-by-Step Planning Timeline (With Checklist)
4–6 Weeks Before: Lock the Foundations
- Confirm event type (birthday, team building, date night, shower) and guest count
- Choose venue (home kitchen, rented studio, restaurant private room)
- Select menu and format (hands-on stations vs. demo + tasting)
- Choose decor concept + color palette (limit to 3–4 colors)
- Create a floor plan: stations, demo area, handwashing, plating bar, seating
- Book vendors (chef/instructor, rentals, photographer if needed)
2–3 Weeks Before: Design and Sourcing
- Order or design signage (welcome sign, station labels, menu cards)
- Confirm rentals: tables, chairs, linens, glassware, extra prep tables
- Purchase decor that supports function: bins, labels, trays, towels
- Build a master supply list by station (ingredients, tools, disposables)
- Plan music and lighting (soft, bright enough for cooking and photos)
7–10 Days Before: Final Coordination
- Confirm vendor arrival times and load-in instructions
- Print recipes and menus (one per guest, plus extras)
- Do a “walkthrough” timeline: arrival, welcome, demo, cook, plate, eat, cleanup
- Assign roles: host, kitchen assistant, floater for restocks, photo helper
1–2 Days Before: Prep and Pre-Set
- Pre-label station bins and ingredient containers
- Pre-set tablescapes and signage (if venue allows)
- Confirm waste plan: trash, recycling, compost bins clearly labeled
- Charge lights, speakers, and any tablets used for recipes/timers
Event Day: Execution Checklist
- Set up welcome zone + handwashing signage
- Style demo station backdrop and test lighting
- Set stations: tools, towels, ingredients, labels
- Open plating bar (covered until needed)
- Do a safety check: clear walkways, no decor near flames/heat sources
- Run a 10-minute pre-brief with helpers/vendors
- Keep a restock caddy: towels, gloves, paper towels, trash bags
Budget Considerations (Sample Breakdown)
Your cooking class event budget depends on venue, instructor, and rentals. Decor should support the experience—not overwhelm it. A practical target for decor and printed materials is 8–15% of the total event budget.
Sample decor budget for a 15–20 person cooking class
- Signage + printing (menus, labels, recipe cards): $40–$150
- Linens (napkins, runners) or rentals: $60–$200
- Centerpieces (herbs/produce/bud vases): $30–$120
- Lighting upgrades (LED panels/string lights): $30–$120
- Organization “decor” (bins, trays, label supplies): $40–$160
- Backdrop element (drape/banner/shelf styling): $50–$250
Ways to save without losing the “wow”
- Prioritize the demo backdrop and welcome sign—highest photo impact
- Use herbs and produce as centerpieces (they can be used in recipes)
- Rent linens instead of buying if you won’t reuse them
- Skip fragile decor and invest in station organization (guests notice)
Vendor Selection Tips (Chef, Venue, Rentals, and More)
Chef/instructor coordination
- Ask what they provide vs. what you must supply (knives, boards, burners)
- Confirm station count and ideal guest-to-station ratio (often 2–4 per station)
- Request their run-of-show timing so decor doesn’t block workflow
Venue questions that affect decor
- Is open flame allowed? (affects candles, balloon garlands, draping)
- Where are outlets and breakers? (affects lighting and hot plates)
- What can be hung on walls? (command strips vs. stands)
- Load-in time window and storage space for packaging
Rental and floral guidance
- Choose stable centerpiece vessels and low arrangements
- Rent extra prep tables before renting extra decor—function first
- Ask rental companies about delivery timing and pickup coordination with cleanup
Common Cooking Class Planning Mistakes to Avoid
- Overdecorating work surfaces: decor should never compete with cutting boards and hot pans.
- Ignoring traffic flow: tight aisles cause bottlenecks and spills. Keep walkways clear and logical.
- Using candles near cooking zones: choose flameless candles or keep real flames in a separate dining area.
- Too many small decorative items: they become clutter and slow down cleanup.
- Skipping signage: labels and station markers reduce questions and keep the class moving.
- No plan for trash and towels: the fastest way for a stylish event to look messy is inadequate cleanup staging.
Real-World Decor Setups (Steal These Layouts)
Example A: Corporate Team-Building Cooking Class (20 guests)
- Palette: black, white, and one brand color
- Decor focus: clean demo backdrop with logo sign + matching station labels
- Guest flow: check-in → apron pick-up → assigned stations → plating bar
- Pro coordination tip: print table/station assignments to reduce start-time delays
Example B: Birthday “Pasta From Scratch” Night (12 guests)
- Palette: warm neutrals, olive green accents
- Decor focus: herb centerpieces, linen runner, menu cards, soft lighting
- Wow moment: a styled flour-and-egg vignette near the welcome sign
FAQ: Cooking Class Event Decor and Planning
How do I decorate a cooking class without getting in the way?
Keep decor off primary work surfaces. Concentrate styling in three zones: the welcome area, the demo station backdrop, and the dining/plating area. Use low centerpieces and clearly labeled bins for tools and ingredients.
What’s the best centerpiece for a cooking class?
Herb pots, bowls of seasonal produce, or small bud vases. They’re stable, low, and complement food photography without blocking sightlines.
How far in advance should I plan a cooking class party?
Plan 4–6 weeks ahead for a rented venue or professional instructor. For a home-based class with a small group, 2–3 weeks can work if rentals aren’t needed.
Do I need a backdrop for the chef station?
It’s optional, but it’s one of the highest-impact decor upgrades. Even a simple linen drape or styled shelf behind the demo station improves photos and makes the event feel more “hosted.”
What are smart budget priorities for cooking class decor?
Prioritize signage, lighting, and station organization first. Then add a simple tablescape and one “wow” visual element (like a small backdrop or welcome moment) rather than buying lots of small decor pieces.
Next Steps: Plan, Style, and Run a Smooth Cooking Class Event
Choose a menu-friendly theme, map your floor plan, and build your decor around function: clear stations, strong signage, and a camera-ready demo area. Once your flow is solid, add the “wow” touches—herbs and produce centerpieces, a clean backdrop, and a curated plating bar that makes every guest feel like a pro.
- Draft your one-sentence event concept and pick a 3–4 color palette
- Create your station checklist and assign a setup timeline
- Price out rentals vs. purchases and lock vendors early
- Do a final walkthrough to confirm traffic flow, lighting, and safety
For more event planning, party organization, and coordination guides—plus timelines, checklists, and style strategies—explore the resources on smartpartyprep.com.
More Articles
 How to Endorse a Third-Party Check Safely: 5 Critical Steps You’re Probably Skipping (That Could Freeze Your Funds or Trigger Fraud Alerts)
What Did the Federalist Party Believe In? The 7 Core Principles You Were Never Taught in High School — And Why They Still Shape U.S. Government Today
How to Endorse a Third-Party Check Safely: 5 Critical Steps You’re Probably Skipping (That Could Freeze Your Funds or Trigger Fraud Alerts)
What Did the Federalist Party Believe In? The 7 Core Principles You Were Never Taught in High School — And Why They Still Shape U.S. Government Today
 How Do You Change Your Party Affiliation in Ohio? The Exact 4-Step Process (No Registration Form Needed + What Happens If You Miss the Primary Deadline)
Where Was Kendall's 30th Birthday Party Held? The Exact Location, Hidden Venue Logistics, and How to Book a Similar Luxury Private Estate (Without $2M Budget)
12 Unexpectedly Easy May Themed Parties That Actually Work (No Over-Planning, No Last-Minute Panic—Just Joyful, Weather-Ready Celebrations You’ll Remember)
Why Is Third Party Verification Important? 7 Real-World Consequences You’re Ignoring (and How One Missed Check Cost a $2.3M Tech Summit $417K in Fines)
How Do You Change Your Party Affiliation in Ohio? The Exact 4-Step Process (No Registration Form Needed + What Happens If You Miss the Primary Deadline)
Where Was Kendall's 30th Birthday Party Held? The Exact Location, Hidden Venue Logistics, and How to Book a Similar Luxury Private Estate (Without $2M Budget)
12 Unexpectedly Easy May Themed Parties That Actually Work (No Over-Planning, No Last-Minute Panic—Just Joyful, Weather-Ready Celebrations You’ll Remember)
Why Is Third Party Verification Important? 7 Real-World Consequences You’re Ignoring (and How One Missed Check Cost a $2.3M Tech Summit $417K in Fines)
 How Do I Start a Political Party? The Real-World 7-Step Launch Roadmap (No Law Degree Required — Just Clarity, Compliance & Conviction)